Arduino and MIDI in
In this second installment of our Arduino tutorial series, we will learn to use the Arduino micro-controller as a tool to control electronics by reading MIDI, in this case turning on the Arduino's built in LED when it receives MIDI note on messages. If you haven't already read our first Arduino tutorial on MIDI out, we suggest you at least give it a quick glance.
The hardware of this tutorial is inspired by the Send and Receive MIDI with Arduino tutorial.
Building the MIDI in interface
You will need the following components to build the MIDI in interface:
- 1 x Arduino UNO R3 (or similar)
- 1 x breadboard
- 1 x MIDI DIN contact
- 3 x 220 Ohm resistor
- 1 x 1N4148 diode
- 1 x 10kOhm resistor
- 1 x 6N138 optocoupler
- and some wires
These components can be bought at your local electronics store or on Ebay. You will also need a MIDI keyboard/controller and a computer running the Arduino IDE.
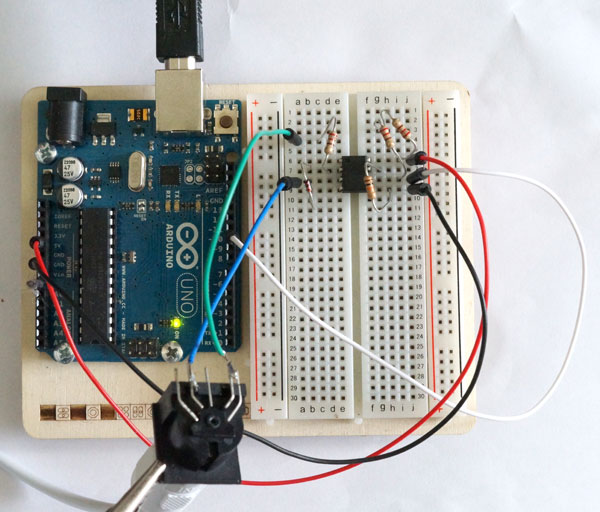
The reason why we can't interface our MIDI gear with the Arduino directly is that the two electronic circuits (the Arduino and the MIDI gear) have to be electronically isolated from each other. This is done by the opto-coupler, shown as a black IC with 8 legs in the middle of the breadboard below. (If you are interested in what the opto-coupler does, check out the datasheet, but in short it contains an LED and a photo detector, transferring the signal as light before turning it into electricity again.)
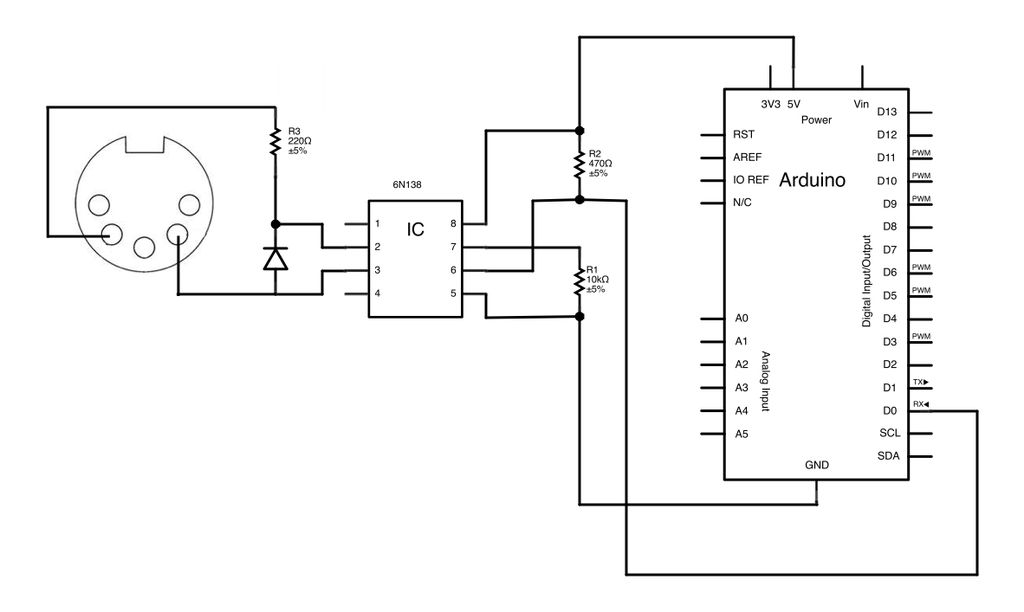
You put the components together like this:
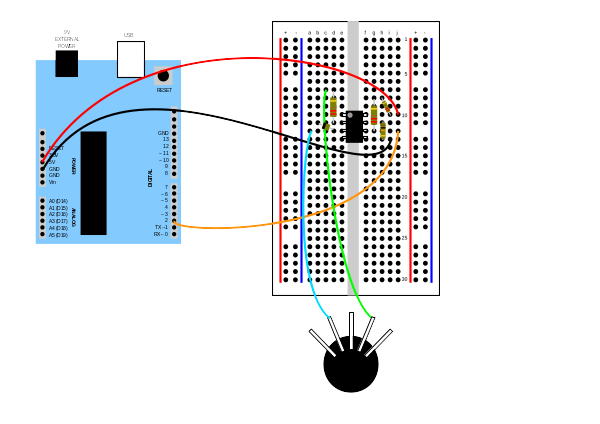
or you can follow the circuit design by Amanda Ghassaei (although she uses D0 while we use D2 as the Arduino input pin, and a 470 Ohm resistor whle we use 2 x 220 Ohm resistors in series):

You can test the interface with the following code, which turns on the built in LED on the Arduino for every MIDI Note On message it receives:
// version 2015-06-01
// Arduino MIDI tutorial
// by Staffan Melin
// https://libremusicproduction.com/
// libraries
#include <SoftwareSerial.h>
// We will use the SoftwareSerial library instead of the Serial library, as this will let us control which pins our MIDI interface is connected to.
SoftwareSerial mySerial(2, 3); // RX, TX
// constants
const byte midiNoteOn = 144;
const int midiSendDelay = 100; // give MIDI-device a short time to "digest" MIDI messages
#define PIN_LED 13
#define MIDI_NOTE_ON 144
byte midiByte;
byte midiChannel;
byte midiCommand;
void setup() {
// setup SoftSerial for MIDI control
mySerial.begin(31250);
delay(midiSendDelay);
pinMode(PIN_LED, OUTPUT);
}
void loop () {
// Is there any MIDI waiting to be read?
if (mySerial.available() > 0) {
// read MIDI byte
midiByte = mySerial.read();
// remove channel info
midiChannel = midiByte & B00001111;
midiCommand = midiByte & B11110000;
// if it is a MIDI note on commannd, blink the LED
if (midiCommand == MIDI_NOTE_ON)
{
digitalWrite(PIN_LED, HIGH);
delay(100);
digitalWrite(PIN_LED, LOW);
}
} // mySerial.available()
} // loop
A state machine
We would like to have some more control over the input and when to trigger the LED. We would like to take some action only when we receive a MIDI Note On message for a specific note on a specific channel.
A nice way to handle several incoming bytes in a row is to use the state machine model. This works by letting the program exist in several different states, depending on what kind of MIDI data it has already received. For our program it is:
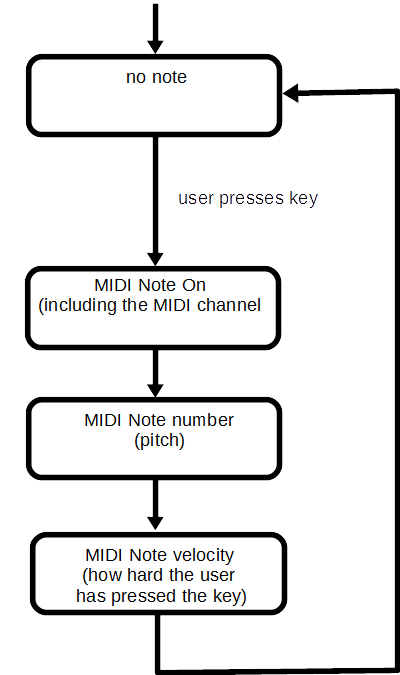
We can do that with the following code which only turns on the LED when the user presses middle C on a controller on MIDI channel 1 (called 0 on some devices):
// version 2015-06-01
// Arduino MIDI tutorial
// by Staffan Melin
// https://libremusicproduction.com/
// libraries
#include <SoftwareSerial.h>
// We will use the SoftwareSerial library instead of the Serial library, as this will let us control which pins our MIDI interface is connected to.
SoftwareSerial mySerial(2, 3); // RX, TX
// constants
#define PIN_LED 13
// MIDI commands
#define MIDI_NOTE_ON 144
#define MIDI_NOTE_OFF 128
// filter MIDI events on channel and note number
const int filterChannel = 0; // MIDI channel 1
const int filterNote = 60; // middle C
// states
#define STATE_NONE 0
#define STATE_NOTE_ON 1
#define STATE_NOTE 2
int state;
// keep action (LED) going for actionDuration milliseconds
bool actionOn;
unsigned long actionTime;
unsigned long actionDuration = 100;
// received MIDI data
byte midiByte;
byte midiChannel;
byte midiCommand;
byte midiNote;
byte midiVelocity;
void setup() {
mySerial.begin(31250);
delay(100);
pinMode(PIN_LED, OUTPUT);
state = STATE_NONE;
actionOn = false;
}
void loop () {
// Is there any MIDI waiting to be read?
if (mySerial.available() > 0) {
// read MIDI byte
midiByte = mySerial.read();
switch (state) {
case STATE_NONE:
// remove channel info
midiChannel = midiByte & B00001111;
midiCommand = midiByte & B11110000;
if (midiChannel == filterChannel)
{
if (midiCommand == MIDI_NOTE_ON)
{
state = STATE_NOTE_ON;
}
}
break;
case STATE_NOTE_ON:
midiNote = midiByte;
state = STATE_NOTE;
break;
case STATE_NOTE:
midiVelocity = midiByte;
state = STATE_NONE;
if (midiNote == filterNote && midiVelocity > 0)
{
digitalWrite(PIN_LED, HIGH);
actionTime = millis();
actionOn = true;
}
break;
} // switch
} // mySerial.available()
// turn action off after predetermined time
if (actionOn)
{
if ((millis() - actionTime) > actionDuration)
{
actionOn = false;
digitalWrite(PIN_LED, LOW);
}
}
} // loop
Resources and files
- Arduino sketches (code) for this tutorial
- Vector (PDF) version of the circuit diagram
- Hi res version of the circuit diagram by Amanda Ghassaei
- MIDI messages