Creating a simple synthesizer in Pure Data – Part I
What is the objective of this tutorial?
In this tutorial we're going to make a very simple synthesizer using Pure Data and learn its concepts and workflow along the way. The objective is to get you started with the software in a kind of hands-on approach, doing something relatively useful, relatively quick. If you want in-depth stuff, there are some great sites on the internet. See pd-tutorial.com and the Pure Data FLOSS manual.
What is Pure Data?
Pure Data (aka pd) is a visual programming language for creating interactive multimedia works. It can be used to make algorithmic compositions, live performances, visual data representation, interaction with sensors and lots of other things. In this tutorial we will focus on audio synthesis.
What do I need to start?
To follow this tutorial you should have pd installed. Version 0.46.1 is used in this tutorial.
I recommend using it with JACK, because then you will be able to have low latency and (if you wish) connect the audio output of your patch to additional processing outside pd before outputting to the speakers. If JACK is already running, selecting
You will also need a way to input MIDI to your patch. If you don't have a MIDI controller, you can use some kind of virtual controller, like VMPK.
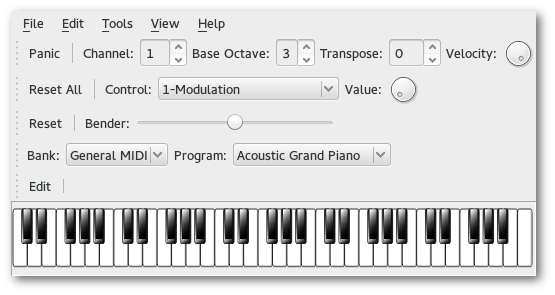
VMPK, a virtual MIDI controller
Remember that pd cannot receive JACK MIDI input, so use ALSA MIDI output in your controller (you can also use a2jmidid to be able to connect JACK and ALSA MIDI ports). Go to
You can use a software like Patchage to manage both JACK and ALSA connections. VMPK can also connect itself to pd in
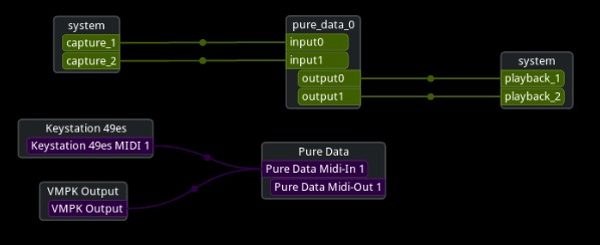
Patchage showing both a MIDI keyboard and virtual keyboard connected up to Pure Data
Go to
If something is not working, make some research on how to configure JACK in your system. This is outside the scope of this tutorial.
Getting started
When you open pd you will see a window where there's not much you can do. The DSP you see here stands for Digital Signal Processing and, as the name says, signals will only be processed when this is on. You will learn what a signal is in a second, but you should know that outputting sound depends on this, so, if you are having problems with sound, check if this is on before anything else. The white space below is a console where pd will output different kinds of information for the user (aka you).
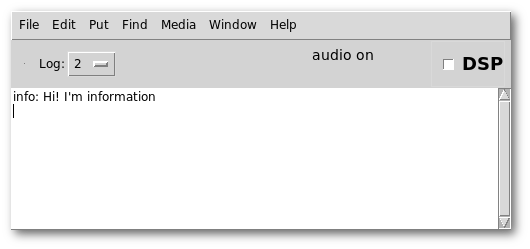
Pure Data's main window
Click
- Press Ctrl+1 and click somewhere to place the object, then write
osc~ and click outside it to confirm. This object is an oscillator. - Repeat the previous step but write
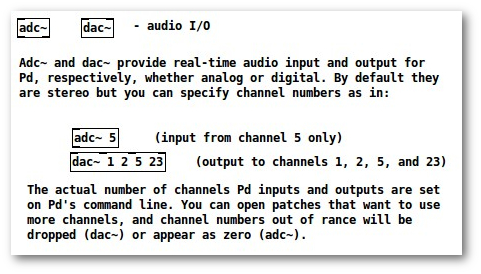
dac~ inside this second object and place it below the first one. dac stands for Digital-Analog converter (or Digital Audio Converter, it's not very clear). This is used to output sound. - Now press Ctrl+3 and place this new object above the
osc~ object. Note that this one is a little different in shape. It will be used to set the frequency of the oscillator.

pd patch with your first objects
| Object types | |
|---|---|
|
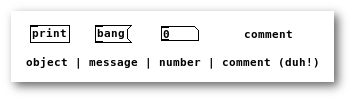
You have now created 2 types of objects: “Normal” objects and a Number object. The kinds of objects you will use the most when working with pd are You can also use the |
| Inlets and Outlets |
|---|
|
The little rectangles on the top and bottom of each object are inlets and outlets, respectively. To connect the objects, click and drag from one object's outlet to the others' inlet. A mouse cursor change will tell you when you're clicking the right place, but in some systems the poor choice of mouse cursor may give you the impression that you are doing something wrong. Just ignore it. Remember that you'll not be able to connect everything to everything. Some inlets expect |
Connect the output of the Number object to the left input of the
Objects connected
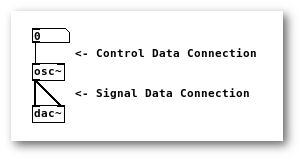
| Control Data and Signal Data |
|---|
|
Bang messages are used to tell objects that you want something to happen in that exact moment, like triggering an object's action or a message. A bang message can be sent by clicking in a Message object with “bang” written on it or with a special Bang object (Ctrl+Shift+B). While Control Data is pretty easy on the CPU, being only processed when ordered to, |
Making some sound!
Now that the stage is set, we can use our patch to produce some sound. First we will need to switch from
| Edit Mode and Execute Mode |
|---|
|
Edit Mode is meant to be used only while you are editing your patch, as the name says. It will allow actions such as moving objects, connecting them and editing their contents. Execute Mode will not allow editing, but will allow you to interact with the objects the way they were meant to, like clicking Messages to send them, using sliders, buttons, etc. So, when you're going to actually “use” your patch, you should always be in Execute Mode. You know which mode you are in by looking at the mouse cursor. In Edit Mode it will be a hand and in Execute Mode an arrow. |
Now make sure DSP is on, then click on the Number object and drag up and down to change its value. The value will be the frequency produced by the oscillator. While the value is smaller than 20 you will not be able to hear a thing, because human hearing starts somewhere around the 20Hz. After that the more you raise the value, the higher the pitch you hear will be.
Each inlet of the
Anyway, now is as good a time as any to introduce you to Pure Data's help system. When you right-click any (or almost any) object in your patch and choose
Help page for dac~
But you might as well not want to do that, so let's move forward.
| A tip for editing patches |
|---|
|
Pure Data cares very little (or nothing) about helping you to make your patches look good. There's nothing to help you with aligning objects or spacing them adequately. The best thing you can do to make things look something close to good is to select objects and move them with the keyboard arrows. To select an object without editing it, hold down the mouse button in some empty space close to it and drag the selection rectangle so it touches only the object(s) you want. Each time you press an arrow key alone the object will move a pixel in that particular direction. Pressing an arrow key while holding down Shift will move it a bunch of pixels. I use this to align objects properly and space them equally, so it won't hurt my eye too much. |
Making some useful sound!
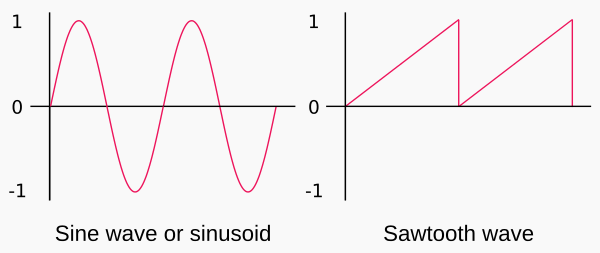
Since what we want to achieve here is a subtractive synthesizer, even if I haven't told you so before, we will now ditch our oscillator in favor of another that creates lots of overtones. A subtractive synthesizer creates different timbres by taking a sound with lots of harmonics and selectively filtering some of them out, and we can't filter harmonics that do not exist.
| Oscillators |
|---|
|
Pure Data features two kinds of built-in oscillators: In Pure Data,
|
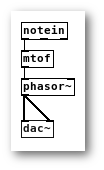
Change your
Your MIDI controller will now come into play. Insert a new object and call it
You can remove these number objects at this point if you wish as they were just for testing.
In a
| mtof and ftom |
|---|
| These are easy. |
So now we must connect the left outlet of
Sounds like crap and never stops
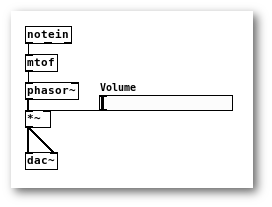
Let's start by adding a volume control using an arithmetic operator with a slider.
| Arithmetic operators |
|---|
|
If you insert an object with one arithmetic operator, it will allow you to do calculations between two numbers or operands. The two inlets are the left and right operands and the outlet is the result. A lot of operators are available, but we will use the If you want you can put a default value for the right operand by passing an argument to the object. |
| Object arguments |
|---|
|
Arguments are values that are passed to objects by writing those values after the object name. Remember to always have a space between the object name and the argument and also between arguments, if there's more than one. In any arithmetic operator object, for example, the argument will be a default value for the right operand. Check each object's help patch to see what arguments can do for that particular object. |
Create a signal multiplication object,
Now let's create a special object: a slider. You can create a horizontal slider with Ctrl+Shift+H and a vertical one with Ctrl+Shift+V. You can choose the one you prefer and, after placing it, connect its outlet to the right inlet of the signal multiplication.
Every number that comes from the oscillator will be multiplied by the value of the slider before it reaches the speakers. To configure the numbers that the slider will output, right click it and select
Now, just by sliding this in Execute Mode you can control the output level of your patch.
Still crap, but now under control
Now we need to be able to stop the sound when the key is not being pressed anymore. The way it works is: when a key is pressed, you get a velocity value greater than zero. In a real MIDI keyboard this value is higher the faster (harder) you press down the key. When a key is released you get a note off signal, that is actually the same as a key press, but with velocity 0.
Since, for now, we are making the most simple synthesizer possible, we will do everything in the simplest way. We will just project the velocity to a value between 0 and 1 and multiply the signal by this.
Start by breaking the connection between the
Since in MIDI velocity values go up to 127, we'll just divide it by 127 to get the value between 0 and 1 that we need. Add a division by 127 object,
Now you can connect the output of this division to the right input of the multiplication you just created and voila. You should now have sound only while you are pressing a key in your MIDI controller. Remember to put some volume using your slider or nothing will come out of the speaker.
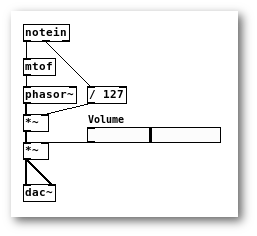
Almost there
You may notice pretty soon that this cheap solution will break as soon as you press more than one key. The first problem is that you have just one oscillator, so there's no way to produce two notes. This is not really a problem, because mono synths do exist! The real problem is that when you release the first note, the second note will stop sounding and that's not the desired result.
To solve this problem we're going to use a set of objects that, at first glance, will look kinda overkill. After seeing the possibilities with this new setup you'll certainly understand the reason why I had to introduce you to all these new objects. They are:
| poly |
|---|
|
The Using the voice number you will be able to handle each note separately, eliminating the problem of one interfering with the other and allowing you to make a polyphonic synth! The first argument you give will be the number of voices and the second needs to either 1 or 0 to, respectively, allow or disallow “voice stealing”. With voice stealing, when all voices are occupied a new note played can take one of the voices to itself. |
| pack and unpack |
|---|
|
If you pass a number as one of the arguments, the respective inlet will expect a number and will be initialized to the value you passed. So, if you pass |
| route |
|---|
|
The route object will receive a list, like the one produced by pack, as input and will output the contents of the list to different outlets depending on the first value of the list. The number of outlets will equal the number of arguments plus one. An object created as Every list starting with |
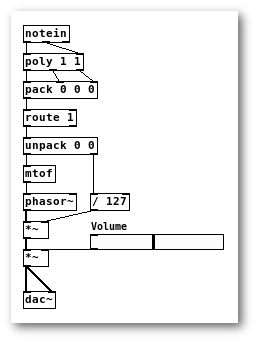
Let's do it, step by step:
- Disconnect the
notein object from themtof and/ 127 notein and the rest of the patch. - Insert a
poly 1 1 object (a poly object with1 1 as parameters, to be more correct, but I'll use this kind of notation to keep it simple) and connect the two first outlets ofnotein to the two inlets ofpoly . - Insert a
pack 0 0 0 object and connect eachpoly outlet to the respectivepack inlet. - Insert a
route 1 object and connect thepack outlet to the leftroute inlet. - Insert a
unpack 0 0 object and connect the leftroute outlet to its inlet. - The
unpack object now must connect likenotein was connected before. Connect its left outlet tomtof and its right outlet to the division by 127.
There! ...but still crap
We're done!
You should now be able to play your synthesizer with no problems. I would not even call that a synthesizer yet, but we are getting close. In the next tutorial we're going to add an ADSR envelope to it and will also allow polyphony.
Written by Eduardo Mezêncio