What is Session Management?
Session management is used to solve the problems involved in managing modular set ups. Ultimately, it allows you to reopen multiple programs, their session files and instantly recall all connections between them.
The problem with managing modular set ups lies in the fact that each individual program uses its own session. Without session managers, you would have to open up each individual program, manually load up the correct session for each of those programs and on top of that, make sure that all
JACK connections between those programs are connected up how you want them to be. Session management looks after all of this for you.
Non Session Manager
In this tutorial we will specifically look at Non Session Manager (NSM), which is a popular session manager. It is a simple, yet powerful program that manages multiple sessions so you can work with modular set ups in a more unified manner.
NSM creates self-contained folders, which contain sessions for each individual program, provided the programs have NSM support. This allows you to easily load up complex modular sessions with one click of your mouse.
Using
JACKPatch, a headless client for NSM, connections can also automatically be recalled across sessions.
Non Session Manager has support for templates (through the use of duplication), making it easy to set up complex sessions and reuse their configurations.
So, why would you want to use modular set ups in the first place?
Why modular set ups?
JACK is ideal for modular set ups. It not only looks after connections between your programs, but it also allows any JACK aware programs to easily sync up with each other. People like modular set ups for various reasons.
First of all, they are flexible, and allow you to use the tools you find best for the job.
This flexibility also has benefits in being stable, as you are not relying on a single piece of software to do everything. In modular set ups, if one piece of software crashes, that's all that happens. It won't bring your whole session down with it. Additionally, using less complex standalone software together means that less can go wrong in the first place.
As well as the above, modular set ups can be more lightweight. This is because you're not using software that is superfluous to your needs. You are only using what you need to get your task done.
Modular software follows the
Unix philosophy of doing one thing and doing it well. Some people would argue that this approach uses JACK to the fullness of its potential.
Our task
In this tutorial, I will show you how to set up a Non Session Manager template, and subsequently use it as the basis for a recording. I will demonstrate this primarily using software from the 'Non' software suite, which is specifically intended to be used as part of a modular set up.
This tutorial is not intended to be a thorough overview of any of the software but I will go through some of their basic concepts and practices so you can get a usable set up, within the context of an NSM session.
The following is the software that I will use -
- Non Session Manager (NSM) – This is our session manager, which will recall our sessions.
- Non Timeline – This is a timeline where you can record your audio tracks into.
- Non Mixer – This is our mixer, which controls track levels, panning, plugin controls, etc.
- JACKPatch – This will allow NSM to remember session connections.
- Carla – While Non Mixer does support plugins, it only supports LADSPA plugins. Carla is a plugin host that supports every plugin format on Linux. This can be used to extend the capabilities of any modular set up.
- Carla also includes a visual connection patchbay. We will use this to manage our session connections.
Update - Since publishing this tutorial, falkTX from KXStudio has implemented LV2 support for Non Mixer. This build is now available in the KXStudio repositories but is not currently available upstream. For full details, check out his post at linuxmusicians.com
Creating a Template
First, we will create a template for our session in Non Session Manager. This will help us understand the concepts behind session management. Let's get started -
Open up Non Session Manager
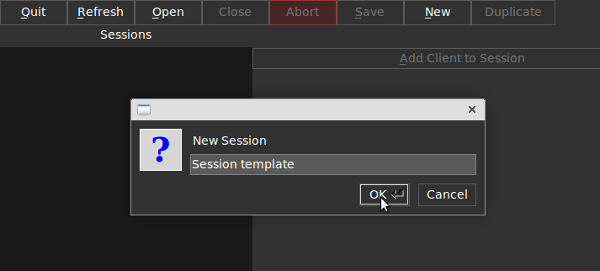
Let's create a new session by clicking on 'New' and giving our session a name. In this case let's call it “Session template”, as it will be used as the basis for a template. More about managing templates later...
Our session is now created but it is currently empty. Let's now add our clients (programs) that we described in our task above.
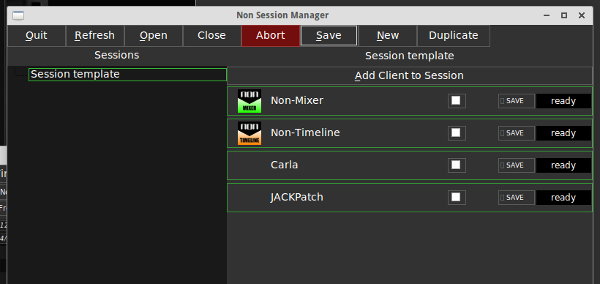
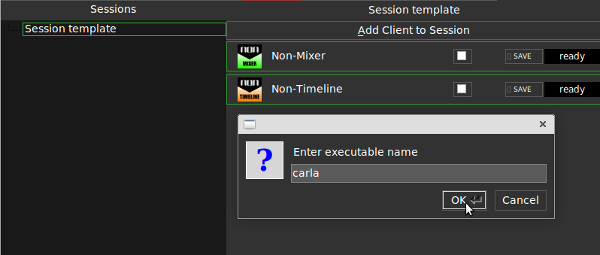
Click on “Add Client to Session”. We will add the following programs using their executable names -
| PROGRAM |
EXECUTABLE NAME |
|---|
| Non Mixer |
non-mixer |
| Non Timeline |
non-timeline |
| Carla |
carla |
| JACKPatch |
jackpatch |
 This is the basis for our template. We now have our session created, our participating programs loaded up, and we also have JACKPatch (headless client) loaded so that any connections we make in our session will now be remembered.
NSM button functions
Before we get started working on our session, it's a good idea to understand what each button in NSM does. There is a thorough explanation about each of these in the
NSM manual. I recommend you read this before going any further.
Now let's start adding tracks and making our connections. We will start with Non Timeline.
Non Timeline
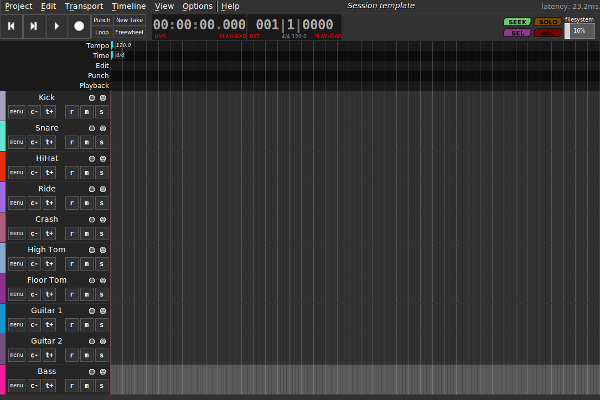
First we want to add our tracks. To do this, go to Timeline > Add audio track (shortcut 'A'). For this template we want 10 tracks, so we will press the 'A' shortcut 10 times. Non Timeline adds mono tracks by default. This is what we want in this case, but if you want to add more channels per track, right click on your track header and go to the 'Type' menu.
Next we will name our tracks. To do this, double click on the tracks name in the track header, type in your name and press enter.
Our track names are as follows -
- Kick
- Snare
- HiHat
- Ride
- Crash
- High Tom
- Floor Tom
- Guitar 1
- Guitar 2
- Bass
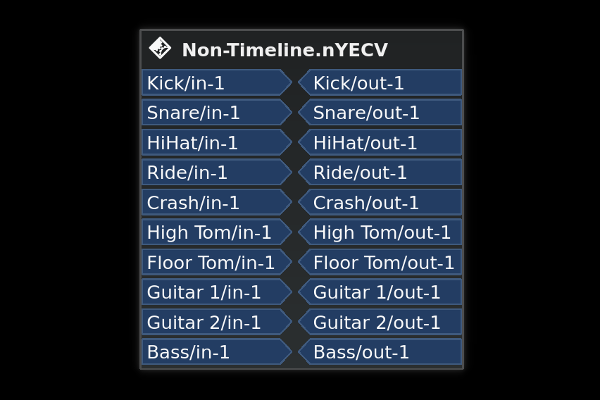
Let's briefly take a look at the Patchbay tab in Carla. You may have to refresh the patchbay canvas area (ctrl + R) for name changes to take effect. Note how you now have all your Non Timeline inputs and outputs named accordingly.
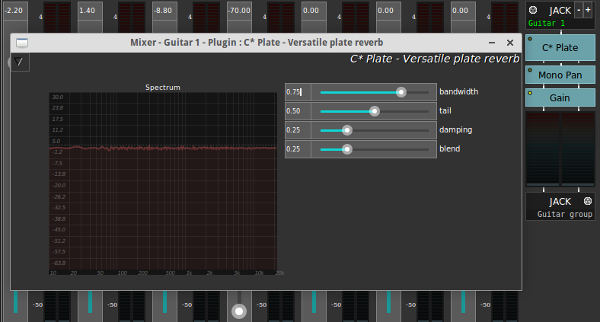
Non Mixer
Next we will need somewhere for Non Timeline's audio to be routed through. In Non Mixer, go to mixer > add strip (ctrl + A) and add 10 strips, as we did in Non Timeline.
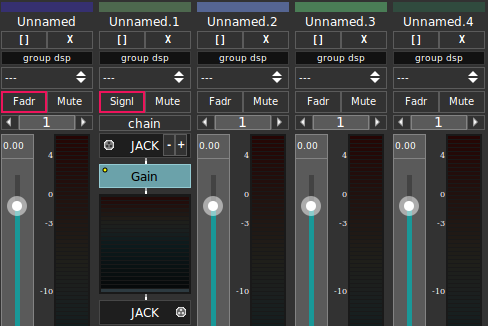
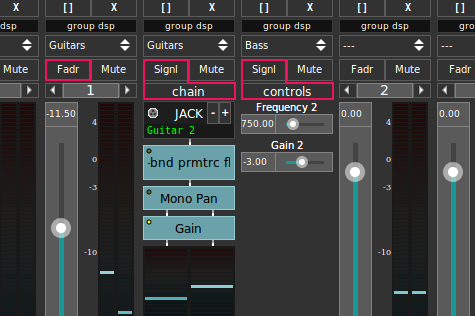
These tracks will also be added as mono tracks by default. Again, this is what we want, but we also want to be able to pan these mono tracks. To set this up, click on 'Fadr' on the mixer strip. This will now change to 'Signl', indicating that you are no longer in Fader view but that you are now in Signal view.
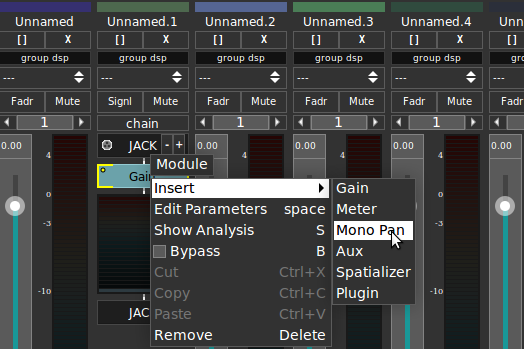
Right click on the Gain module and from the insert menu, select 'Mono Pan'.
This will add a 'Mono Pan' module above the 'Gain' module. You can now click on the 'Mono Pan' module to bring up an adjustable pan slider. If you look in our patchbay, you will also notice that adding this module has added a second audio output port for that mixer strip. This allows us to pan any audio routed through that mixer strip. Add a panner to each track in Non Mixer.
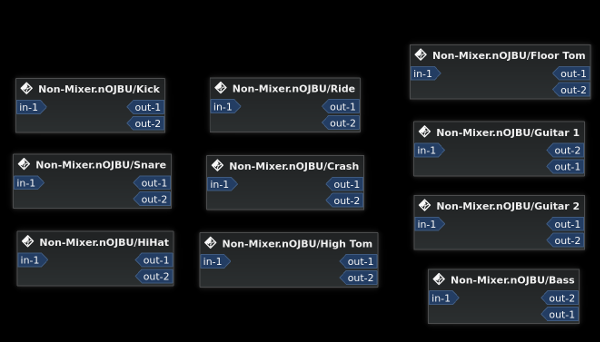
Next we will need to name our mixer strips. Double click on “unnamed” at the top of your mixer strip and type in the new name you want to use and press enter.
Now, let's take a look at Carla's Patchbay again (making sure to refresh). Note the multiple named blocks associated with Non Mixer.
This looks messy at the moment, but we are not done yet. Let's make things easier to manage in the patchbay by creating groups within Non Mixer.
Groups
Assigning mixer strips to groups is a great way to help with organizing connections. There can also be
performance benefits in doing so. We can currently break our session up into three groups -
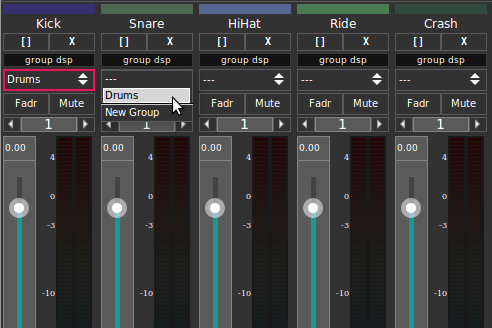
On our kick drum mixer strip, click on the drop down menu just below 'group dsp' and create a new group called “Drums”. When you move onto the next mixer strip you will notice this group can now be selected from its drop down menu. Add all of your drum tracks to this group.
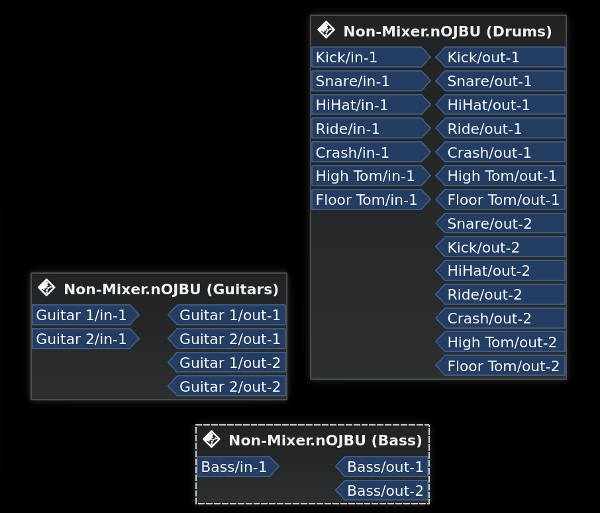
Let's revisit and refresh our patchbay in Carla. Notice how all the drum mixer strips are now grouped together in their own block. This is what creating groups does and it makes it very easy to organize large numbers of inputs/outputs.
Repeat the steps above to create a Guitar group and Bass group. This will make it much easier to find the connections you want to in Carla's patchbay.
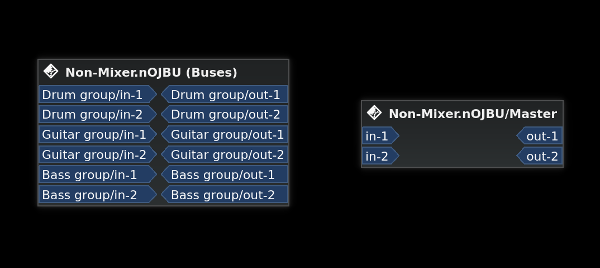
Setting up buses and master bus
Before we start making any connections, we need to have additional mixer strips in place to make it more manageable. For this I will add the following -
- Drum group bus
- Guitar group bus
- Bass group bus
- 1 master bus
As previously mentioned, mixer strips are added as mono tracks by default. We want these mixer strips to be stereo, so in the mixer strips just above the fader/meter, you will see a box labelled '1'. This tells us there is only 1 input/output for that mixer strip (this doesn't apply to channels with mono panners). Click on the right arrow to add another channel. We want to set this to 2 so that these mixer strips are now stereo.

Next, name all the above tracks appropriately and, with the exception of the master bus, create a group for them called 'Buses' so that they are all neatly contained within their own group block in our patchbay.
We now have all the components set up, neatly organized and ready to go. Let's make some connections.
Making connections
There are two types of connections -
- Connections that allow for recording (directly into Non Timeline).
- Connections that allow for playback (from Non Timeline, through Non Mixer and out to your playback system)
For now we will concentrate on our playback connections, as more often than not, you will make your recording connections at the recording stage. We want to make sure our playback connections are all set up for our template.
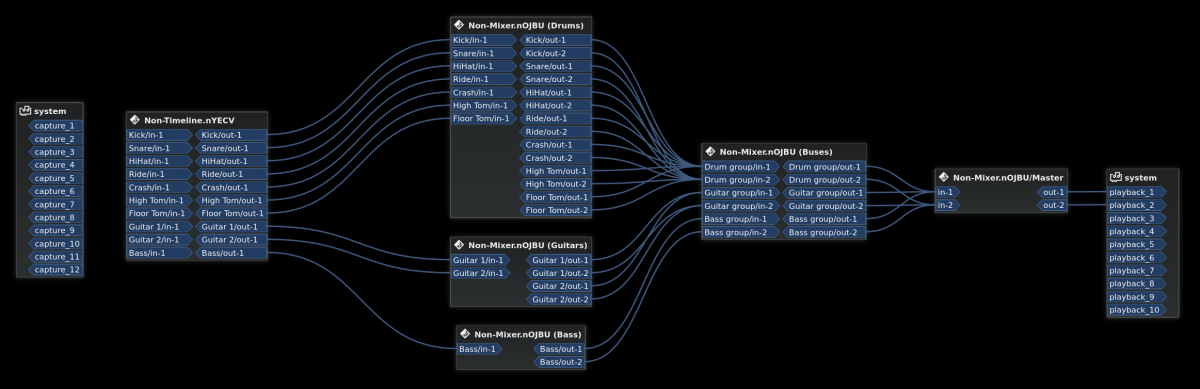
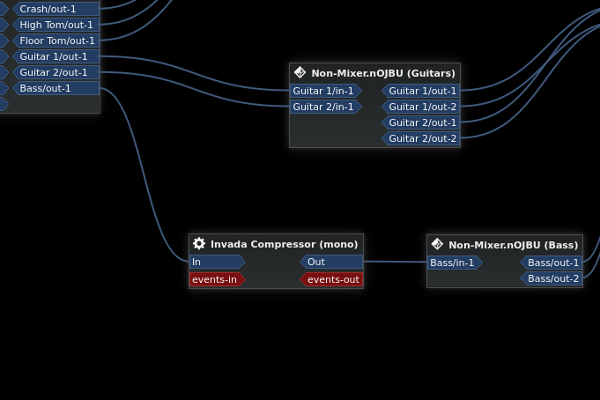
Here is the signal flow I want to achieve -
This set up allows for flexible mixing. We can -
- Individually control instrument levels and effects (track mixer strips)
- Collectively manage group levels and effects (group buses)
- Manage overall session levels and effects (master bus)
The following is how all these connections look in our patchbay -
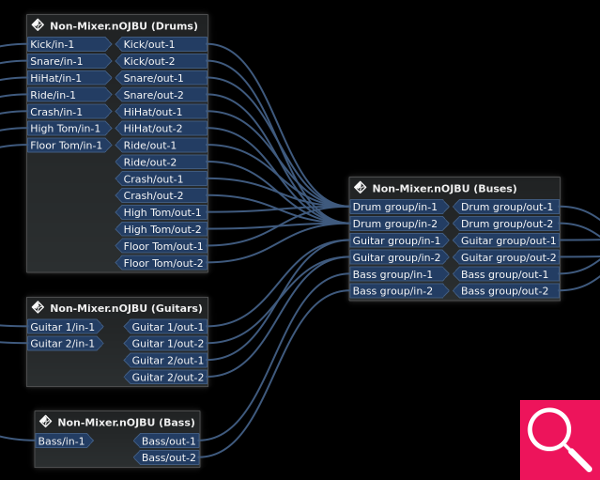
Success! We now have our template fully set up. Next, we will look at how to work with templates in NSM.
Using Templates
Due to the nature of how session management works, templates in NSM are supported through the use of the duplication. The following is how to work with templates in NSM -
- Open up NSM
- Click on 'Template session' to open up the template that we just created
- Click on duplicate.
- Name our new session and click OK.
We are now working on a new, and independent, version of our sessions template. This will allow us to use the same layout, settings and connections of our template without touching the original.
Note – If you are worried about accidentally recording over a session template, you can easily back them up for such an eventuality. You will find all sessions in the 'NSM Sessions' folder, which you will find in your home folder.
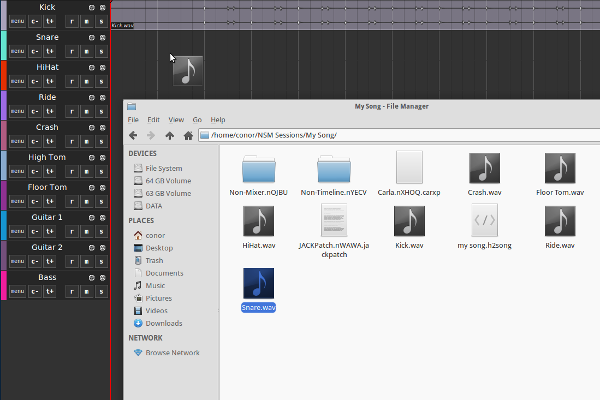
Getting material into Non Timeline
Now that we have our session up and running, it is now time to start recording. There are two ways to get material into Non Timeline. We can record material into individual tracks but we can also drag and drop existing audio material onto the timeline.
Note - Drag and drop will only work if you drop an audio file onto a pre-existing track. Dragging onto empty canvas will not add your audio file.
For drums, I have existing tracks that I exported from
Hydrogen. I used the '
export to separate tracks' option within Hydrogen, so I have each individual drum in separate audio files. This gives me more flexibility when mixing. Let's open up our file manager and drag these files one by one onto their respective tracks.
Note - It is best practice to first move these audio files into your sessions respective folder within 'NSM sessions' to make sure they are always discoverable. This also allows them to be moved with the session folder if you wish to do so at any stage.
Now we can finally listen to some audio playback. With the Non Timeline window in focus, press the 'home' key on your keyboard if the playhead is not already at the beginning of the session and press 'space' to play.
Note - Non Timeline's playhead doesn't support dragging. Use the 'P' key on your keyboard to position the playhead to your mouse cursor.
Recording material
Next I want to record my instruments into Non Timeline. For this we will need to go over to our patchbay to make our input connections. I have my guitar signal coming in through 'input 1' on my interface, so we will need to connect this up to our 'Guitar 1' input in Non Timeline. This will allow my guitar signal to be recorded onto that track, but what about monitoring and checking my meter levels?
Simply connect whatever signal you are recording into Non Timeline, into Non Mixer at the same time. This will be routed to your playback system so you can monitor it, and it will also allow you to check input meter levels.
You can then record your material onto their respective tracks (make sure to arm enable tracks and the session). When all of this is done, your playback levels can easily be adjusted in Non Mixer.
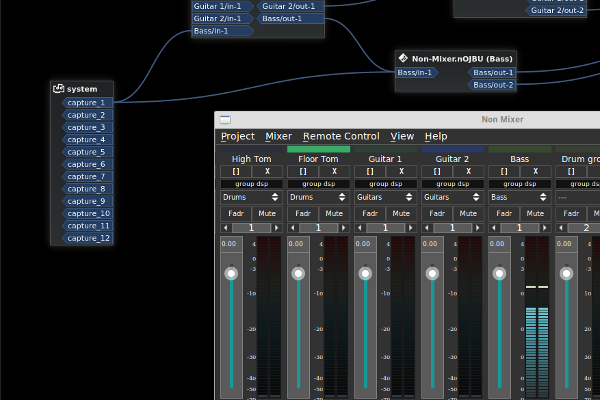
Mixing in Non Mixer
Non Mixer is a simple but powerful piece of software. The flexibility provided by Non software's intended modularity are just what makes it special. For instance, any mixer strip in Non Mixer can be whatever you want it to be. It can be a track mixer strip, a bus, or a master bus. How you connect it up is what gives it its purpose.
We've briefly touched on this when adding our 'Mono Pan' module, but let's look at them in a bit more detail.
Each mixer strip has 2 primary views -
- Fader – In this view you can adjust the fader and monitor the full length meters.
- Signal – This is where you add, edit and arrange plugins, panners, create aux sends, etc.
Within Signal view, there are additionally two sub-views -
- Chain – This is the default 'Signal' view. This is where you add, edit and arrange plugins and modules.
- Controls – This is where you can add inline plugin controls. Plugin parameters can be arbitrarily added, via binding, to the controls section for quick and easy access.
Adding plugins in Non Mixer
Adding plugin modules in Non Mixer is done in the same way as we added our 'Mono Pan' module. Make sure your mixer strip is in 'Signal' view ('Chain' sub-view). Right click on whichever module in the chain you want your plugin to be added before. Navigate to insert > plugin. This will bring up the plugin manager. Selecting a plugin will add it before/above the module you right clicked on.
If you want to rearrange the plugin order on a mixer strip, you can right click on the plugin module you want to move, select cut, and then paste it with the same method as adding a plugin, ie. right clicking on the module you want it to be placed before/above.
Adding a plugin above the gain module will add it
pre-fader, and adding it below the gain module will add it post fader. To add a plugin post-fader, right click on the meters. This will allow you to add it before the meters, but after the gain module.
Binding controls
If there are any plugin parameters that you would like to have easy access to, you can bind these so that they show up in 'Signal' view ('Controls' sub-view).
This is also useful for pan controls. To do this, left click on the module you want to bind a control from. This will open up the modules window. Right clicking on a slider will show up a little box called “Bind”. Tick this box.
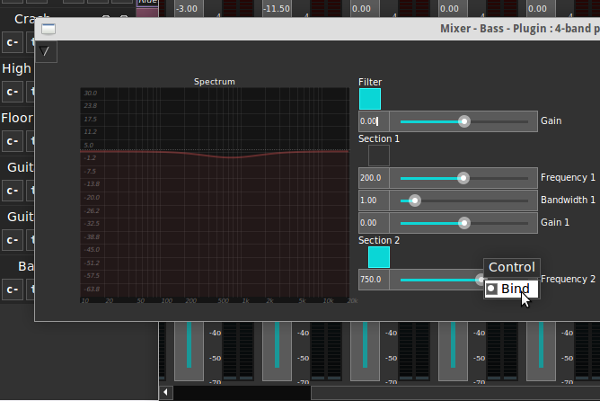
Now when you navigate to the 'Controls' sub-view, you will have access to any parameters that you have binded.

To learn more about Non Mixer and it's capabilities, check out the manual.
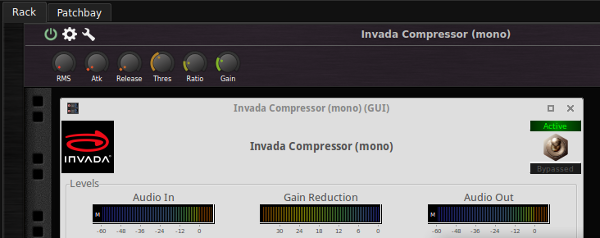
Using plugins in Carla
Up until now we have only used the patchbay area of Carla but it's addition in the template was to leave the option open for using it as a plugin rack. Adding it to your session will effectively allow you to use any plugin format supported under Linux within your session.
Adding plugins in Carla is as simple as clicking 'Add Plugin' from the toolbar and selecting which plugin you would like to load. You can access the plugin controls from the Rack tab. Going back to the Patchbay tab will allow you to connect up your plugins inputs and outputs.
The following is a typical example of inserting a pre-fader plugin, hosted in Carla, into Non Mixer -
Organizing session folders in NSM
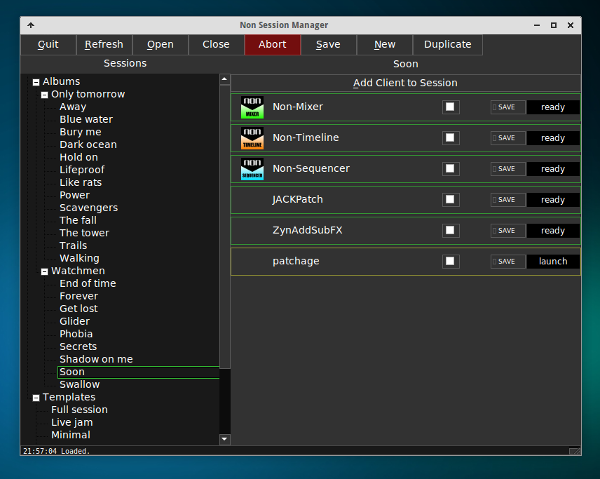
NSM organizes sessions alphabetically by default. This helps to find sessions but you can even go further and create folders and sub-folders to keep your sessions organized.
You can easily organize sessions from within your file manager. Simply go to the 'NSM Sessions' folder. Every folder is a session, but you can bundle these into custom sub-folders.
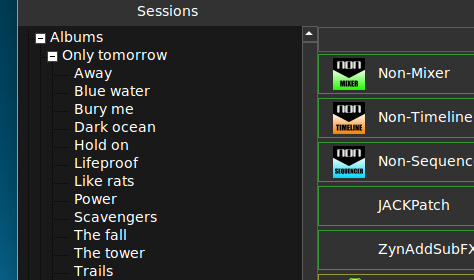
For example, say you have songs that you want to put into a specific sub-folder. You can create an empty folder inside your 'NSM Sessions' folder, and move the sessions inside of it. When you restart NSM, you will see that these are now showing up as sub-folders of the folder you created.
In the example below, a folder called 'Albums' was created in the 'NSM sessions' folder. Inside of the 'Albums' folder was created another folder called 'Only tomorrow'. I then moved all NSM session folders that I wanted to show up under this sub-folder into the 'Only tomorrow' folder using my file manager. Note that you have to restart NSM to see these changes take effect.
By now you may be wondering how you export audio coming from a number of different programs. While in this example we only have audio being generated from Non Timeline, in other cases you may have another program also generating audio.
In either case, the audio from these is mixed down into a final output signal. In this case it is mixed down to a stereo signal which is coming out of Non Mixers master bus.
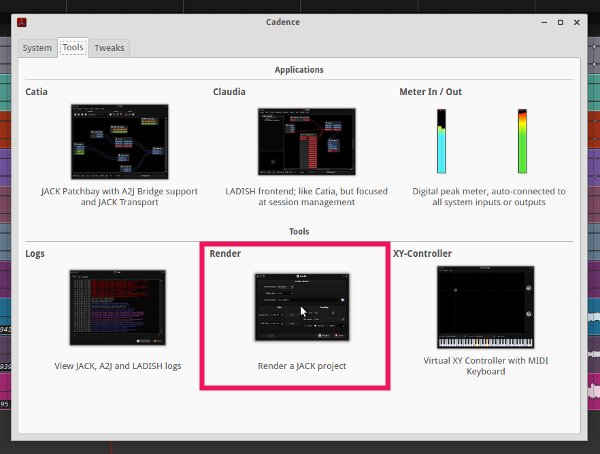
Jack capture is a tool that allows you to capture audio from JACK. There are various ways to use this but if you are using Cadence from
KXStudio, the easiest way is to use '
Render'. You will find this by going to the tools tab within Cadence.
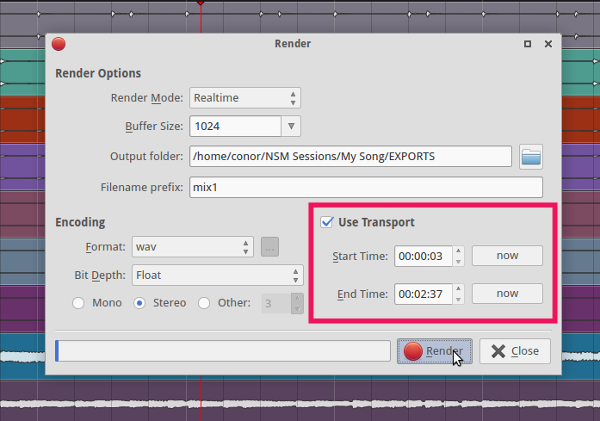
When you open up Cadence-Render, you will be greeted with a number of options. The main ones you need to worry about are -
Render mode – You have two options here, realtime or freewheel. Realtime will export your audio in realtime (essential if you are using outboard gear in your recording set up). Freewheel will export your session faster than realtime.
Output folder – Where do you want your audio file to be saved to
Filename prefix – What do you want your file to be named
Encoding format – What file format do you want your session to be exported to
There are also options for how many channels you want the file to be exported to. Unless you have a specific reason for needing more channels, you most likely will want to leave this set to stereo.
Use transport – This is very handy if you know exactly what parts of the timeline you want to render within. I recommend you use this.
Simply set the playhead in Non Timeline, or whatever other program you are using, to the beginning of where you want to export from and press 'now' beside Render's start time. Next, place the playhead at the end of where you want to export to and press 'now' beside end time. Render will then export the audio between these two points.
Summary
And that's it! You should now have an understanding, start to finish, of the basic concepts and practices involved in session management and how to apply these to Non Session Manager.
You can easily add more programs to modular set ups, MIDI sequencers for example, but the concepts are all the same. JACK allows for programs to sync with each other. This is something that alongside session management can allow for elaborate set ups. You can easily have fully featured workflows, that are specific to your needs, using modular software.
There are many reasons why you may want to try out modular set ups. If you do decide to go this route, session management will make your life much easier.
Thanks for reading!
Written by Conor Mc Cormack