Autotuning & pitch correction with Zita-AT1 in Ardour
Be it for correcting those slightly out-of-tune notes from your singer, or going all the way to a Cher effect, an auto-tune plugin might come in handy. There’s not a lot of those designed for Linux, though choices do exist :
- Autotalent, a LADSPA plugin by Tom Baran
- TalentedHack which is a port of the former to the LV2 format with some additional work by Jeremy Salwen
- VocProc, another LV2 plugin by Igor Brkić
- Zita-AT1 by Fons Adriaensen.
The 3 formers have not seen any development since 2010, and the consensus tends to favor Zita-AT1 for the job, for its quality. Igor Brkić (author of VocProc) commented “there is zita-at1 which does pretty much same job but much better”.
So we’ll go ahead and make use of Zita-AT1 in Ardour. Unfortunately (for this use case), Zita-AT1 is not a plugin you can add in the mixer strip, but an autonomous JACK app. So setting it up is not as straightforward, but remains easy enough.
Setup and connections
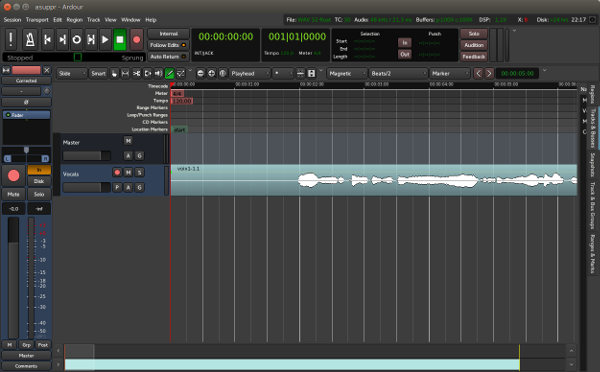
We’ll suppose we already have JACK running, and Ardour launched with a mono track called Vocals, on which is our recording. Zita-AT1 should be started, too.
Step 1 - Create the result track
Create a new track : right click under the Vocals track header or Track > Add Track or bus. This track should be mono too (as Zita-AT1 is mono). Let's call it “Corrected” and leave the rest at their defaults.
Step 2 - Connecting Ardour to Zita-AT1
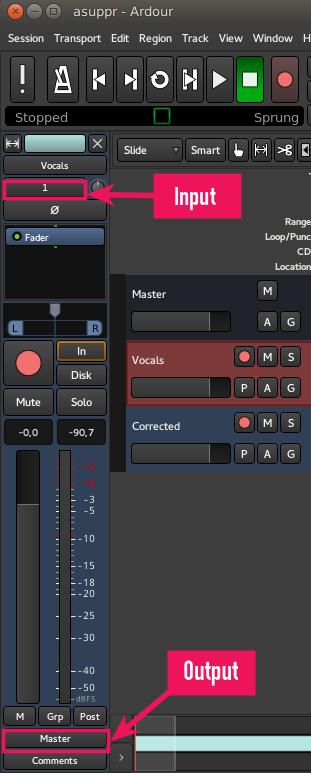
Select the Vocals track header. On the left is the corresponding mixer strip (Go to View > Show Editor Mixer if this is not visible). We need to make the signal go from the Vocals track to Zita-AT1 to be processed. So, the OUT of the vocals track should be connected to the IN of Zita-AT1.
You can see on the screenshot above, in the strip, a button labeled Master. It's the output button deciding where the audio goes. It is by default set to go to Ardour’s Master bus, which is itself connected to your speakers. Let's click on that and choose Routing Grid.
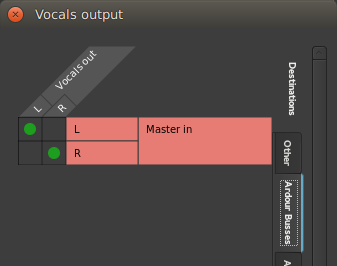
You’ll be prompted with the window shown above. It may seem complicated, but it makes a lot of sense.
- At the top, you have this tracks output so Vocals out, splitted in “L” and “R” for left and right. Even if the track is mono, you may use the panner or a stereo plugin which requires a stereo output, so it makes sense.
- On the right side, you have all the possible connections you can make inside and outside Ardour, be it a track, bus, an external processor etc…
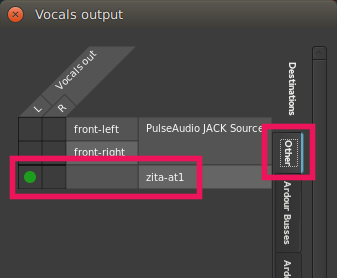
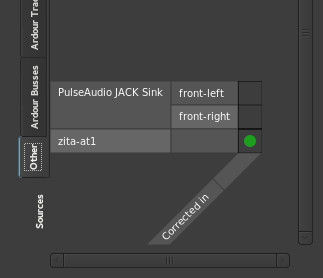
We’ll disconnect the track from the Master by clicking the 2 green dots connecting Vocals out L and R to the Master bus L and R (in the Ardour Busses tab). Then we ’ll go to the Other tab. On the Vocals track we will connect either L or R to zita-at1 by clicking in the intersections in the table. The Vocal track is mono, so both L and R outputs of the tracks are the same at the moment (we have not modified the panning), so tick only one box, either L or R. If you check both boxes, this will sum the two outputs, risking clipping (thanks Erik Marsk for the comment).
Now the Vocals track’s output is plugged into Zita-AT1’s input. Let's close the Routing Grid window.
Step 3 - Connecting Zita-AT1 back to Ardour
Now select the Corrected track header. We want to connect the input of this track to the output of Zita-AT1. Let's open the input routing grid by clicking the button in the mixer strip, just under the track’s name Corrected.
The logic is the same as the output grid : at the bottom is your track’s input, and on the left are the numerous source that you can connect to the input of your track.
By default, your system’s audio interface should be connected (Hardware tab, system/capture_1 or capture_2 should have a green dot). Click on the green dot(s) to disconnect your audio interface from the input of this track. We’ll connect the output of AT1 instead, so go to the Other tab and create a link between zita-at1 and Corrected in.
Step 4 - Monitoring input
If you press Play right now, you’ll hear… Nothing ! Don’t worry, this will soon make sense. We need to tell Ardour to listen to whatever is inputted into the Corrected track, even though it’s not recording.
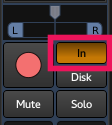
Select the Corrected track and, in the mixer strip, click the In button just right of the big red record button. This allows Ardour to monitor the input.
It’s now time to press Play again and… Hopefully it works !
Quick guide to Zita-AT1

Let’s see how Zita-AT1 works by exploring its interface. From left to right :
- The MIDI button allows you to control what the target note should be at every moment. More on this later !
- On the top left is a blue keyboard. When you play your track through Zita-AT1, the detected notes will appear in yellow. You can use this keyboard by clicking any of this notes (which then turns black) to forbid the use of this note. Eg. if you know your singer should not hit an F note, click on it and AT1 will not use the F note and change the pitch to the closer between an E and an F sharp.
- On the bottom left is a meter, centered around AT1’s target note and showing the shift between the target note and the detected one. The more the distance between this two notes, the more AT1 has to shift the pitch to correct it.
- The Tuning knob allows to set the pitch wanted for an A : the default is 440 Hz but some may have a use for a different reference for the A (like 442 Hz for some orchestras). For our use, we don’t need it.
- The Bias knob allows to slightly shift the target value in AT1 allowing it to be less strict when choosing the target note.
- The Filter knob sets the time between the beginning of the note and the moment the correction kicks in. For a natural, slight correction, set it to be slower, and to get a Cher effect, set it to fast. The transition will be audible.
- The Correction knob decides how much of the error is corrected, from 0 to 1 (=100%). Like the Filter knob, the more you correct the pitch, the more robotic / Cher it sounds. So for a slight correction, set it to .5 or less.
- Last, the Offset knob allows to shift the pitch by this many semitones. So a detected E with an offset of -2 would be transformed by AT1 to a D (2 semitones down). Do not use this for pure correction.
(Optional) Zita-AT1’s MIDI input, and how to set it up in Ardour
As we’ve seen before, Zita-AT1 allows one to plug in a MIDI signal to force the note at any given moment instead of basing the target note upon the detected one.
This can be useful for some kind of electronic music, or to correct a very bad singer, as long as he is rhythmically well synchronized with the MIDI track. For those in the know, it acts as a MIDI vocoder.
Let’s put that to good use.
Step 1 - Create a MIDI track
Back to Ardour, add a track as seen previously, but this time choose MIDI Tracks. Let's name it MIDI. Yeah I know… Leave all the rest at default except the instrument. You can set this to none unless you first want to hear what you create before feeding it to AT1.
Step 2 - Create a melody
Switch to Draw mode by hitting “D” on your keyboard or choosing the pencil tool in the toolbar. If the piano roll does not appear left of the MIDI track, resize the track header until it appears. (Note : the “F” keyboard shortcut allow to put the selected track in full screen).
Then draw a rectangle in the MIDI track, by left clicking and dragging along your MIDI tracks timelime, to create an editable region where you want to create your melody.
Using the Draw tool, add your notes to the MIDI region by left clicking, to compose your melody.

Step 3 - Connecting the MIDI track to Zita-AT1’s input
We want the output of our MIDI track to be fed into AT1’s MIDI input.
Let's do like in step 2, click the output button (which should be labeled Master at the moment), then Routing Grid.
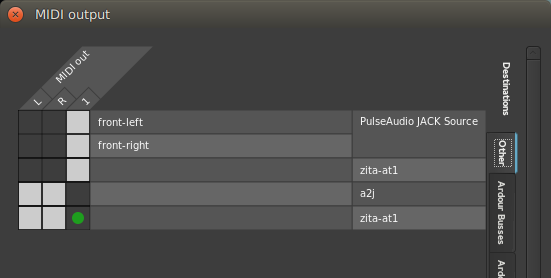
Our MIDI track has 3 outputs, the 2 stereo audio outputs (as an instrument plugin is used to create a sound out of MIDI informations, and this instrument plugin can output audio in stereo), and a “pure” MIDI which sends MIDI informations (note on, note off, etc…). It is this MIDI information we need, so let's connect MIDI out 1 (not L nor R) to zita-at1 in the Other tab. There are 2 zita-at1 possible outputs but only one (the “MIDI in” of AT1) can be connected to MIDI out 1, as Ardour tells apart MIDI inputs/outputs from audio ones.
Recording the result
From now on, if you want to get the result the next time you’ll launch Ardour, you have to think about launching Zita-AT1 too, and probably redo all the connections. It can be a little cumbersome, so we should record our resulting track to freeze our result, and be able to avoid having to reset everything next time.
Step 1 - Disable the monitoring
Select the Corrected track, and disable Monitor Input by clicking the yellow In button in the mixer strip (cf. step 4).
Step 2 - Arm the track and Ardour for recording
Either in the track header or in the mixer strip, click the red circle button arming the track for recording. Click the main Toggle recording Button in Ardour’s toolbar. As the output from AT1 is already routed to the input of our Corrected track, that’s all there is to it.
Click play, and let the recording take place.
Step 3 (optional) - Cleaning up
You can now safely unlink Ardour and Zita-AT1 :
- Select the Vocal track and click it’s output button at the bottom of the mixer strip (now labeled zita-at1). Choose Disconnect.
- Select the Corrected track, click its input button (zita-at1) at the top of the mixer strip and choose Disconnect too.
- Select the MIDI track, click its output button and choose (again) Disconnect.
- You can now safely close Zita-AT1 and save your session.
We could have deleted the Vocal and MIDI tracks, as they are not connected to anything anymore. It is good practice to keep it though, if you later want to change anything, like change the amount of correction or slightly change the MIDI melody. Plus, keeping the Vocal track allows, if you connect its output back to the Master bus, to have both the original and corrected tracks together, allowing you to mix between those two sources to get a maybe more natural sound.
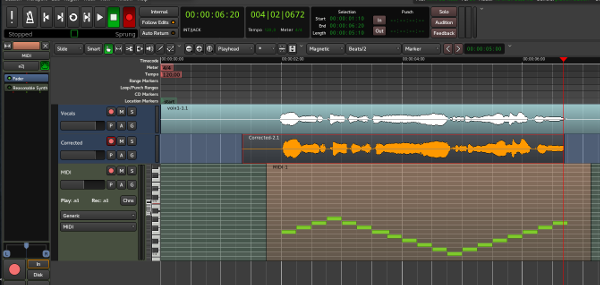
Another point worth mentioning : As you may have noted by looking at the last screenshot, Zita-AT1 creates a slight delay between the processed track and the source. To keep your voice perfectly in sync with your other tracks, you should shift the processed region a few milliseconds to the left to align in perfectly with your unprocessed track.
And that is it !
It should be noted that this method of routing the signal from inside Ardour is just one way of doing it, as all the connections could be done from JACK outside of Ardour (eg. with QjackCtl or Catia). Feel free to do it your own way !
Written by Edouard