Ardour 3 Tips and Tricks
Ardour 3 is a very capable and complex piece of software. A consequence of this is that working with it at times can be a bit daunting, and every possible action cannot always be as intuitive as one might like. In this article, I will go through a number of things I have learned to do in Ardour 3, that hopefully can increase the efficiency of your own work if you’re not already doing them! Improving the efficiency of interacting with software leaves more time for actually making music, and we all want that, don’t we? So, lets jump right into it!
…one quick note first though. A lot of these tips are about structuring and organizing your session. These are things some people likely will frown upon as unnecessary. I’m not going to lie – there’s a certain pleasure gently instilled in my body when I’m using a perfectly structured and organized session, a pleasure that is hard to match. Nevertheless, the art of properly structuring and organizing has a purpose. However, if you’re one of those IceCube-type of people, and you do your songs in one long sitting, export and then are done with them forever, you won’t need this.
If you instead belong to the type of people like me, who like to live in constant agony from thinking their songs all suck and never will be good, it is likely that you one day would like to go back and keep working on your song (or even just open and look at your mess without your head imploding from the chaos). By properly structuring your session, you will save a few braincells. Believe me, I’ve had so many songs that I put on my (very full) “Meh, this is 90% done, lets finish the last parts later”-shelf, that I dragged along for months before actually finishing, just because of the doomsday-state they were in. Learn to love structure in Ardour, and you won’t regret it!
Now, lets jump into it!
Bind every action you use regularly to hotkeys
This is something that, despite being something of a “hotkey guy”, took me quite a while to actually do. Ardour 3 allows you to bind just about any action available either in its menu, or in its keybinding dialogue. To bind an action to a key, just hover over the desired action in the menu of Ardour 3, and press the key (or combination of keys) you want it assigned to.
Make use of the keybinding possibilities in Ardour 3!
It’s also worth it to take a look at, learn and practice the pre-existing hotkeys available in Ardour 3. Here’s a short list of some of the hotkeys I use the most. Some are my own bindings and some are default in Ardour 3. Either way, making music without these would be much slower (and taxing on the muscles!!).
| Hotkeys I frequently use in Ardour 3 | |
|---|---|
| Action | Hotkey |
| Loop selected region | J |
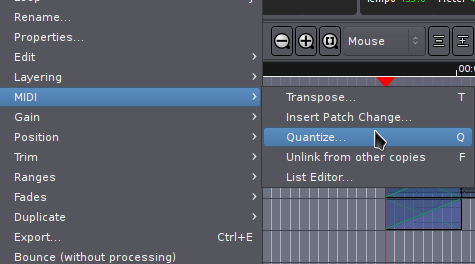
| Transpose MIDI-notes | T |
| Reverse region | Alt+R |
| Expand height of selected tracks to maximum | Ctrl+F |
| Decrease height of selected tracks to minimum | Ctrl+1 |
| Duplicate region | D |
Use busses for commonly used effects
This will probably be self-evident for some, and totally new for others. Effects like reverb are very intensive on the CPU, so a way to reduce the load on the CPU (and reduce the complexity of your session) is to set a reverb up on a bus, and then just use sends to control how much you want reverbed from each track. Luckily, Ardour 3 provides us with something called Aux-sends, which is internal to Ardour. This makes it very easy to send signals from tracks and channels around like you want them. Simply right-click in the plugin chain-space of a track, and select what bus you want to create a send for in the “Aux Send”-menu. This gives you a handy little control to adjust the strength of the send signal with!
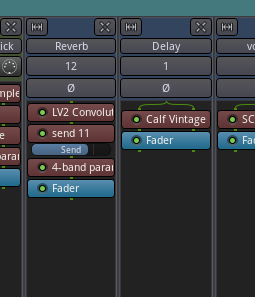
Ardour 3 allows for some nice internal routing with its Aux-sends.
I usually use something like three recurring types of busses in every song. One or two for reverb, one or two for delay’s, and one or two for the drums. These are busses that more or less look the same plugin-wise each session (check out the track-template tip for efficiency here), but that I always use. One example is the delay-bus, which I always have, and that I have to a pre-configured delay that I like. I then use this bus as kind of a “glue” in the song, where I send a little of every appropriate instrument to the delay bus, and let them echo together. This creates a nice delay-tail that can be used to blend/glue your song together better. Uhm… Yeah…. use busses….
Use track and song-templates when you can
Another nice feature that I overlooked for a criminally long time is the possibility to create templates for both sessions and channels. For something like setting up sidechaining (which I will eventually do a tutorial about), this is invaluable as it saves tons of time. Session templates are addressed here in the manual, and track templates essentially work the same way, but only for individual tracks.
Note: To make best use of track templates, make sure that you’re consistent in how you name your busses and tracks. This enables you to use routing to a certain bus or track (for example, route a send on the violin track template to the reverb) within your template.
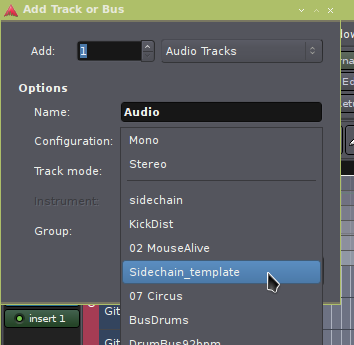
Save your commonly used tracks and buses as templates in Ardour 3. This means you’ll spend less time hooking stuff up, and more time making music!
To give some ideas of how track templates can be used to speed up producing, I’ll make a little list explaining my common cases of using track templates, and what the templates contain:
| How I use track templates in Ardour 3 | |
|---|---|
| Function of the template | Contents of the template |
| Set up a 3-in-2-out bus for sidechaining | SC3 plugin |
| Set up a stereo bus for delay | Calf Vintage Delay |
| Set up a stereo bus for reverb | convoLV2EQ (set to highpass at 200hz) |
| Set up a MIDI-track with a synth | Tal Noisemaker send to Sidechain bus |
| Set up a MIDI-track with a staccato cello | LinuxSampler LV2 (staccato cello sfz loaded)EQ (set to how I usually EQ thatinstrument) |
With a little creativity and thinking about how you usually do stuff, things like adding commonly used instruments and chains of plugins can become a lot easier with track templates!
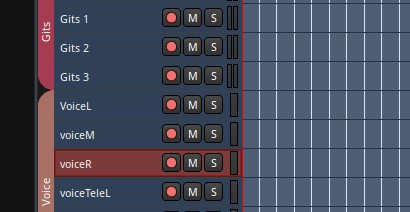
Name and group everything appropriately
Something I’m willing to bet my study debts on is that most programmers have a very structured and organized way of naming their tracks and channels. This is something we all can learn from! Make sure you create the habit of naming your channels appropriately. This makes everything much more fun to work with, when you realize that you don’t have to play the contents of hidden tracks in order to figure out what they actually contain.
Naming
For “chunks” of channels and tracks, I use prefixes quite a lot, and I like that. For example, I work a lot with guitars and strings. Two guitar tracks in my session could then be named “GitRhythm L” (for the left-panned rhythm guitar) and “GitRhythm R” (for the equivalent, but panned to the right), and my string tracks could be named “StrCelloStacc” (for a staccato cello) and “StrViolinSust” (for a violin playing sustained notes).
Ardour 3 allows you to group just about anything. Make use of that. Plus, the colors look nice!
Groups
The next part, groups, is building on having good and uniform names. However, we now take it a bit further by using Ardours built in function to group channels and tracks, and have them share some properties. Using groups has several benefits:
- It’s an easy way structure and keep track of your different parts in the session.
- It’s an easy way to quickly show/hide many channels at once.
- It allows you to easily create subgroup buses and multiple aux-sends at once.
- It adds some nice color to your session.
…ok, the last one might not be 100% needed, but the rest are really useful! Ardour 3 creates a colored strip above the channel strips in the mixer (and also to the left of the tracks on the canvas) to show which tracks and channels are grouped together. This helps us see what tracks are grouped, and also allows us to activate (or de-activate) the effect of grouping, by simply left-clicking the colored strip. Groups can share a number of useful properties, which I’m not going to go deeper into, but can be found in the Ardour 3 manual. Look through that page, you’re very likely to find plenty of good uses for groups in Ardour 3!
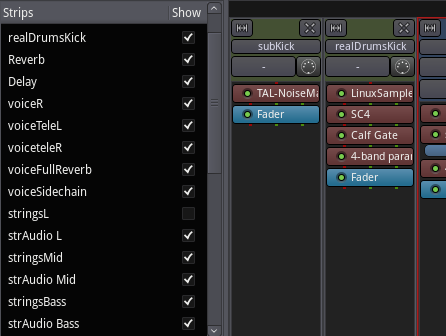
One final thing I would like to add is that I group just about anything. This is entirely to ease the navigation of the session, as having things grouped gives easy access to showing and hiding the grouped elements easily. The “Tracks & Busses”-tab available in the Editor List in the canvas, and the Groups section of the mixer, all provides easy toggling of the visibility of the different groups.
Worth noting is that when grouping purely for easy toggling of visibility, it’s important to disable all of the shared properties in the groups. This makes sure that nothing you do on a track or channel in the group affects anything else in the group, unless you specifically select it to do so in the group properties.
Use ‘Combine Regions’ to make new regions
This will go up on my hotkey list any day now! This feature is a must for me in sessions when I work with mostly audio. What this does is that it combines the audio regions you’ve selected into one region. Not that revolutionary, but the applications of it for someone like me, who like to edit/cut up samples and move them around/generally chop stuff up, is something I couldn’t be without now.
An example of how it’s useful could be when creating an 8-bar loop out of several claps and finger snaps. I start off by aligning a number of individual samples how I want them, over 8 bars. After that is done, we’re looking to combine the regions to a new region spanning over the whole 8 bars, so we can easily duplicate it and have the loop be uniform with the rest of the loops in the session.
Problem here is, Ardour 3 will only combine the selected regions. For us, this means it won’t be a full 8-bar loop, as we don’t want our claps and snaps to play both at the start and the end of the loop. This is solved by simply adding a bit of silence to the start and the end of the 8 bars. Then we combine the regions, which gives us a full, usable 8 bar loop. To get silence, I usually just cut a silent part off any region I have lying around in the session. You can also create (using Audacity for example) and use a simple wav-file containing only silence, and import that to Ardour, to use as a building block.
I also talk a little about using this for some common use cases in my article about sidechaining in Ardour 3.
Keep your session tidy
Yes, I’m going to whine about the structure and organization of the session again. Thing is, I quickly realized that a tidy and organized session is way more fun to work with than the “organized” chaos I used to work in. This was before I actually forced myself to start cleaning up the session regularly. I usually test all sorts of things in my songs, which eventually tends to leave a rather large number of unused channels around. Make sure you go through and remove what you’re not using!
Also, make sure you arrange your session often. As channels and tracks pile up, I often find I spend an alarmingly large amount of time on scanning through my channel list for whatever track or channel I’m after. This is time I instead could’ve spent on being depressed about the song sounding like crap. So shortly, arrange the session properly, and make sure you frequently put your tracks together in a coherent manner, and you’ll have more time left for the fun parts of music!
RTM, and ask!
Invest some time in going through the manual of Ardour 3. Even just spending an hour in there is guaranteed to reveal all sorts of new, cool stuff you did not know. It’s also likely to make your producing life a lot easier. I think I know my way around the program fairly well, but I’m amazed about how much there’s left to learn for me every time I look through the manual.
Finally, ask how to do stuff! There’s forums, IRC and mailing lists, just go there and ask if there’s a better way of doing things. Odds are someone has already done what you’re trying to do, and hopefully has an efficient way of doing it!
Thanks to goibhniu for feedback and proof-reading of the article!
Written by Gabriel Nordeborn