Sidechaining in Ardour 3
Ahh, sidechaining! The effect us fans of electronic music fear our partners will discover just how much we actually like, and the effect that makes anti-modern electronic musicians shake from hatred. Sidechaining has many different names (ducking is an additional one), but when I speak of sidechaining, I refer to what’s popularly known as “the cool effect that makes everything pump to the beat in electronic music”. Sidechaining itself though has a pretty wide range of uses outside of just “moar pumpz plx”. In this article, I will focus on the “pumpz plx”, but the way we’ll set up sidechaining here will enable you to achieve most of the common sidechaining effects, like ducking background music to speech and whatnot. So, the goal of this article is to do a simple sidechain of a synth to a kickdrum, making the synth duck in rhythm with the kickdrum. Very simple, but very powerful, especially in modern electronic music.
Pre-requisites
This tutorial assumes that you have a little knowledge of Ardour and music production in general, but not much. I will try and go as basic as I can without being annoying. If you’re familiar with Ardour, you’re likely to want to skim the article, as it contains a lot of basic stuff. My aim is to provide a guide that anyone with a little prior experience can follow, but at the same time cater to more advanced users that just don’t know sidechaining yet.
If you’re a bit more used to Ardour and just want to know how to do the actual sidechaining, click here to skip the rather irrelevant parts below about creating the material for sidechaining.
The version of Ardour used in this tutorial is Ardour3.2. However, this should work with most prior versions of Ardour too.
You will need a plugin called SC3 that will do the actual sidechaining. If you have the KXStudio repos, it’s available in the package swh-lv2 (
Also, you will need something to sidechain, and a basic kick drum to sidechain to. So, get yourself a basic kickdrum sound. As for materials to sidechain using the kick, and for the sake of demonstration, I will use TAL NoiseMaker LV2. You can get that from the Disthro-project, or preferably the KXStudio-repos (which are awesome, kudos to falkTX).
Lets go!
Setting up the needed tracks and channels
So, lets roll! You can use whatever session you already have, or just set up a new one. Just because I prefer a little bit higher tempo in electronic music, I’ll start off by setting the tempo to 130 bpm. You can leave the tempo at whatever you feel is nice, it doesn’t matter.
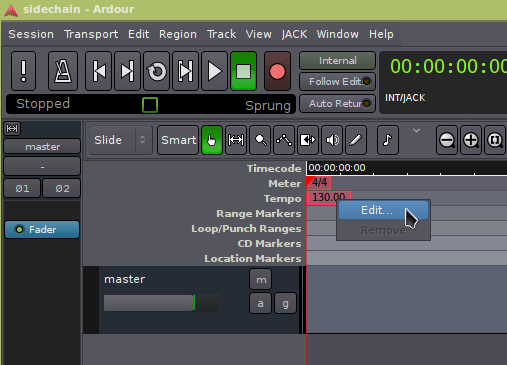
Set the tempo by right-clicking the red tempo indicator and selecting edit.
Next up, we’ll need our basic components. As always, you’re free to set up Ardour like you want, but I find it’s a great help to make sure Ardour is set to Grid-mode. This snaps everything you move to the grid (which is based on the tempo of your song), effectively putting whatever you move in sync to the tempo. If you want to set up Ardour like me, follow the picture below, and make sure you’ve got Ardour set to Grid.

Grid, Snap to Beats, and Edit Point Mouse all set up.
Next up, we’ll add our kick and snare, and set up a simple electronic beat. You can import the soundfiles of the kick and snare to Ardour directly, and it’ll automatically create two new tracks for you for the sounds. The import dialogue is available through
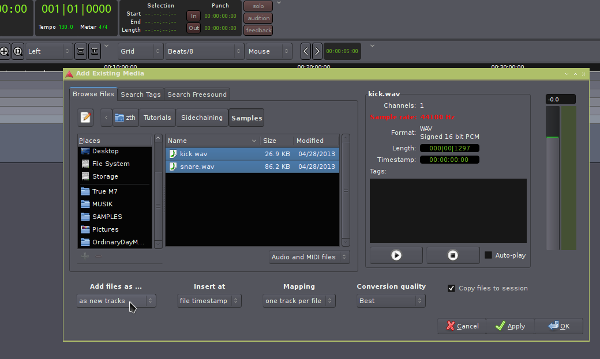
Import the files, and add them as new tracks.
Now, lets just make a simple, classic electronic drum pattern spanning over 4 bars, with the kick on every beat, and the snare on every other beat.
First off, when working like this, I always set the grid to “Beats”. You’ll notice in the picture above it’s set to Beats/8 (next to the Grid-option). This means that the grid now snaps to 1/8th notes. Change that to Beats, to snap to full beats, and your life will be easier.
If the regions of the kick and snare aren’t in the proper size to create the pattern (and they won’t be, as I made them, muahahaahaha!), you’ll have to resize them appropriately. This is easily done by dragging the bottom left or right corners of the region. To quickly build a pattern, resize the regions so they cover a whole bar, like in the picture below. Then mark the regions and press “D” (for duplicate) and place the new region appropriately on the canvas. For the pattern in the picture below, you can simply first make a full bar (hint: in the picture below, there’s 4 bars as indicated by the thicker white lines) consisting of 4 kick regions and 2 snares. Then, just select them all, press duplicate and move the duplicated regions in place. Repeat until you have 4 bars.
Warning: Make sure that you place every drum hit perfectly on a beat. Grab every region (when making the base pattern you then duplicate to create the pattern in the picture below) and make sure it’s on the beat. The yellow text appearing will indicate that by telling you it’s on XX | XX | 00, where X can be anything, but 00 should be 00. If you don’t do this, things might end up off-beat when using duplicate.
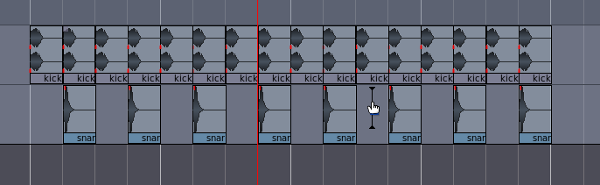
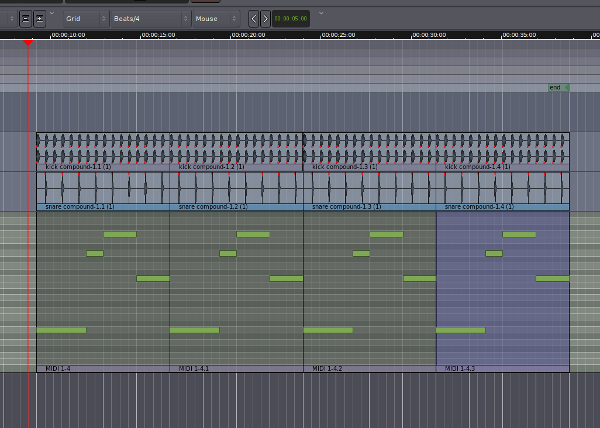
Simple electronic beat with the kick on every beat, and the snare on every other beat. Commonly known as the “four-to-the-floor”, and ideal for sidechaining.
Just to, like we say in Sweden, “kill two flies in one whack”, I’ll quickly go through how to use a nifty little feature in Ardour called “Combine Regions”. Even though I’m sure programming it is as hard as finding the Higgs boson, its function is rather simple and it does what its name hints; it combines the selected regions into one. This is handy for people like me, who make music based on using a lot of loops. So, saving you from more blabbering, what we’re going to do here is to combine the pattern we just created for the kick and the snare into one full 4 bar region each. However, to get two regions spanning over the full 4 bars we’ve created, we need to make sure there’s a region we can select in our track at the start of the first bar, and also at the end of the 4th and last bar. This will combine anything in between, giving us the full 4 bars we want.
To achieve this, we can cut out a bit of silence from one of our regions, duplicate it as many times as we need, and use it as building blocks to make sure our regions covers the whole 4 bars. To achieve this, set the grid (next to the roll down that now should say Grid, as we changed above) to “Beats/4”. This will make anything snap to 1/4ths. Then hover with the mouse at the end of a region where there’s silence, and press “S” to split the region at that point. Select the newly split region, duplicate it using “D”, and then put it at the first bar of the snare track, as indicated in the picture below.
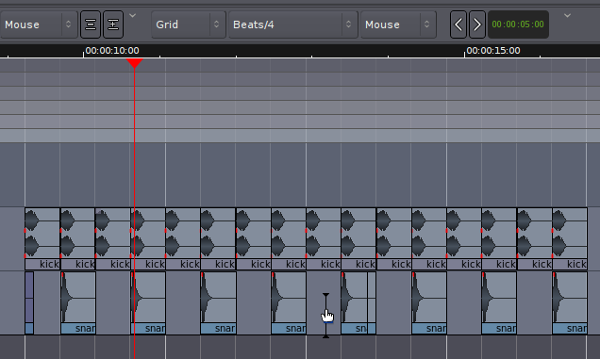
Right of the cursor is where the region has been split. The selected region is the duplicated split region containing silence, that’ll allow us to combine our regions into one.
Now comes the easy part! Start by selecting the full 4 bars on the snare track, right-click a region, and go to Selected Regions -> Edit -> Combine. This will give you a new, full 4 bar region of snares. Yay!
Now, do the same for the kick (make sure it really starts snapped to a beat, and ends snapped to a beat, so you get the full 4 bars here too).
There we go! A region of 4 bars each, both for the kick and snare, that you can easily work with using duplicate etc. To make your beat a bit longer, select both the kick and the snare region, and press “D” a couple of times, or ’til you’re satisfied with the length of the song.
The material for the sidechaining
For simplicity, I will just be using TAL NoiseMaker LV2 and a factory preset for this, as that’s something that’s easily available to anyone. This works just as good with anything though, but for the sidechaining to be as audible as possible, we need something that has quite sustained notes (so you can actually hear them pump). We’re going to use one of my favorite presets of NoiseMaker *drumroll* Fuzzy Cargo!! Or to be more specific, “TAL LD Fuzzy Cargo” in the preset list.
So, add a new MIDI-track, load up TAL NoiseMaker on there, load “TAL LD Fuzzy Cargo”, increase the size of the MIDI-track in the editor canvas to reveal the piano roll, and left-click on the canvas of the track to add a new MIDI-region. Now, position this MIDI-region and resize it so it covers 4 bars before we start getting into the juicy stuff.
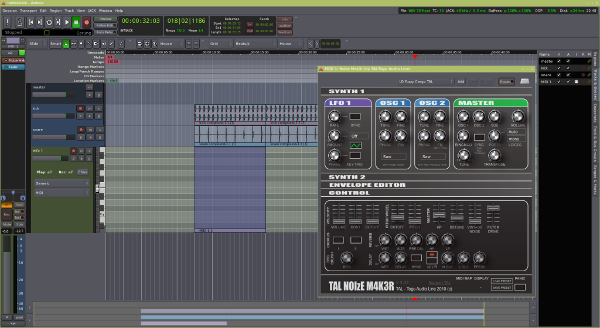
The new MIDI-track with NoiseMaker, and a 4 bar region up.
Now, just put down any note progression you think sounds nice, and that covers the full 4 bars. When you’re done with that, duplicate the region (using “D”, remember?) until you cover 16 bars with it. This will leave us with a little to play with.
The current state of your session should look something like this.
There! We have something extremely basic now, but that’ll do for demonstrative purposes. If anyone missed it, the intention is sidechaining the synth we just created to the kick, so that it pumps in rhythm. Lets move on to the actual sidechaining!
Sidechaining in Ardour 3
(Welcome back advanced user!). Now, we’ve finally gotten to the part which this tutorial was supposed to be all about… err… Anyway, it’s time to set up the actual sidechaining!
The way this is done is by using a bus. If you don’t know what a bus is, use your favorite search engine quickly and read up. A little conceptual knowledge is always good! On this bus, we will have a plugin that will do the actual sidechaining. This plugin is effectively a compressor, that only activates when it recieves a signal in a special input. The plugin therefore has 3 ins (one input for triggering the sidechaining, and stereo in for the sound) and 2 outs (stereo output for the sound). The way the routing works here is that the plugin takes the trigger signal for the sidechain in the first input, and the sound you want sidechained in the second and third. What happens in the actual plugin then is:
- If something is playing in the first input (like a kickdrum), activate the compressor to compress the sound playing in the second and third input. Then output this sound through the outputs.
- If nothing is playing in the first input, just output what’s playing in the second and third input without any compression applied.
….uaaaah?! Input output input output! Was that understandable at all?! Even I, who’s supposed to know (and write!) this got confused now. Anyway, specifics isn’t that important, lets move on…
So, what we effectively can take from this is that we need a 3 input 2 output bus for the plugin. This is doable in Ardour, but you need to create and modify a 3-channel bus to achieve it. So, lets create a 3-channel bus and add the SC3 plugin to it! To create a 3-channel bus, just select it under “Configuration” in the Add Track-dialogue.
Now, as SC3 has 3 inputs but only 2 outputs, we need to delete one of the outputs of the bus, as it currently has 3. You might need to read this paragraph a couple of times, bear with me. To do this, left-click the bottom of the mixer strip (the outputs, where it currently should say “Master”) to bring up Ardours built in connection matrix. Here you’ll see the connections of the bus (and you’ll likely feel like a retarded seal if you haven’t used Ardour a lot before, as it can look pretty complicated). At the top, you’ll see the labels 1, 2 and 3. These represent your output channels. We want to kill -9 one of those (hehe, Linux-joke!! for non-nerds: we want to remove one), and we’ll achieve this by right-clicking the label 3, going through “[Busname] out ->” and then choose “Remove ‘3’”. Yaaay, there we go! You can see the fruits of your extreme technical skills in manipulating internal routing of a contemporary complex digital audio workstation and its carefully engineered components *breathe!!*, by noting that what was earlier called 1 and 2, is now called L (for Left, or LINKS, in German) and R (for Right, or RECHTS, in German). And that’s it, the bus is now properly setup. Lets set the actual plugin up!

How to set up the SC3 for sidechaining.
I won’t go into too much detail here, as that’d involve talking about how compressors work (or how I think they work…….), but set your SC3 up like I’ve done in the picture above. I will however do a quick run-through of the parameters:
- The attack controls when the compressor starts working. We want this to happen as close to the kick hitting as possible, which means we set it as low as possible.
- The release controls how quick the compressor should stop working. We want this to be fairly low (but not too low), to make the effect distinct and in rhythm. As our tempo is pretty high in this song, going too high on the release might make the compressor not stop working before another kick hits, triggering it again. This effectively would mean that there would be a sidechain, just that you couldn’t hear it because the compressor never gets fully de-activated. This is a setting that you however can play around with some.
- The threshold controls when the compressor starts compressing, in sound strength of the material that’s going to be sidechained (so the synth in this case). What you need to know about this right now is that it controls the strength of the sidechain, together with…
- …the ratio! This controls how heavily the compressor compresses the material. Simple as that!
In the example here, I’ve set both of them to the max. This is because I have another way of controlling the sidechain, which I will go through in another article of more advanced use of sidechaining. As soon as you’re finished with this tutorial, you should go back and try adjusting these both to learn them and what they do.
I’m not going to talk about either knee or makeup gain, and I extremely rarely touch either of them, because they have effects that either isn’t very audible for my use of sidechaining (knee), or is better achieved in other ways (makeup gain). Finally, there’s chain balance, which has to be set to 1 in order for the sidechain to accept being triggered by sound from the first input.
We’re close now. Very close. Veery close. Basically, everything is set up here properly, and ready to sidechain. To test it out, go to the outputs of the kick (left-click the bottom of the mixer-strip saying “master” again), and add a connection of both its outputs to the first input of the sidechain. To find the sidechain-bus, you’ll have to click the “Ardour Busses”-tab. Then simply tick both of the boxes right next to eachother in by the label 1, so that your outputs of the kick are connected to the first input of the sidechain. This will send an instance of the kick playing to the input of the sidechain, in addition to sending it to the master bus (which is connected to our system outputs, which therefore makes it audible).
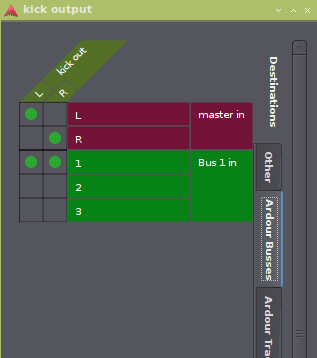
To properly set up the sidechaining, connect like this.
Now, finally, we just need to connect the outputs of the synth to the appropriate inputs of the sidechain-bus, and we’re golden. To do this, start by disconnecting the outputs of the MIDI-track, by right-clicking the bottom of its mixer-strip (like in the earlier procedures. I’ll just assume you know this from now on. Oh crap, the tutorial’s almost over….) and selecting “Disconnect”. Then, open up the connection matrix of the outputs of the MIDI-track, by left-clicking what you just disconnected (a nice little “-” should be there now instead), navigating to the “Ardour Busses”, and then simply connecting the L-channel of the track to the 2nd input of the bus, and the R-channel of the track to the 3rd input of the bus. VOILAAA! Done!! Just press play, and you should hear the synth ducking to the kick! To experiment, try muting the kick and un-muting while playing. Sidechaiiiin!
And that was it! You now officially know how to sidechain for moar pumpz in Ardour3. Congrats!
…some final homework for you! To avoid repeating the tedious process of setting up the sidechaining-bus again the next time you want to do sidechaining, you can save the bus you’ve configured as a track template! You’ll find the options for that by right-clicking the name of the bus. To add a new bus using that template, just go to the Add Track-dialogue, and choose your newly created template in the “Configuration”-box. Viola!
Written by Gabriel Nordeborn