Setting up and using Drumgizmo in Ardour
A French translation of this article can be found over at LibraZik. Thanks to Olivier for this.
What is Drumgizmo?
Drumgizmo is a drum sampler plugin available in the LV2 plugin format. It is also available as a standalone version. There are already drum samplers available for Linux, so what's so different about Drumgizmo?
Drumgizmo's main aim is to simulate a real drum kit. It supports the following features -
- Multiple layer velocities
- Velocity groups
- Mic bleed simulation
- Multichannel output
Velocity layers give each drum piece dynamics, from soft hits to harder hits. On top of that floating velocity groups allow randomization of velocity layers, giving it a more human feel. Both of these help avoid Drumgizmo sounding robotic or suffering from machine gun drum rolls.
In addition, Drumgizmo also supports mic bleed simulation, just as you would have when micing up a real drum kit. If you trigger a snare sample in Drumgizmo, you will also hear the snare sound bleeding into Drumgizmo other output channels, mimicking how other mics would pick it up. Part of why miced up drum kits 'gel' together in a mix is due to mic bleed so having this simulation gives Drumgizmo an added layer of realism.
In this tutorial I will show you how to -
- Load up Drumgizmo as a plugin in Ardour
- Load up a drum kit
- Correctly route Drumgizmo
- Test out Drumgizmo with a sample MIDI file
What you will need
For this tutorial, I will be using the following -
- Ardour
- Drumgizmo
- A Drumgizmo drum kit, in this case, the DRSkit (download it here)
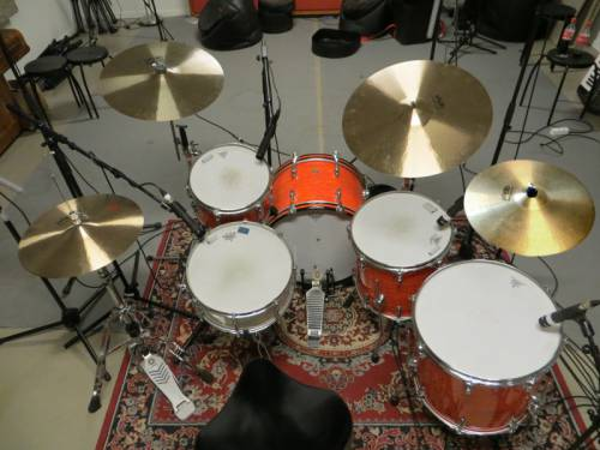
Picture of the DRSkit being sampled
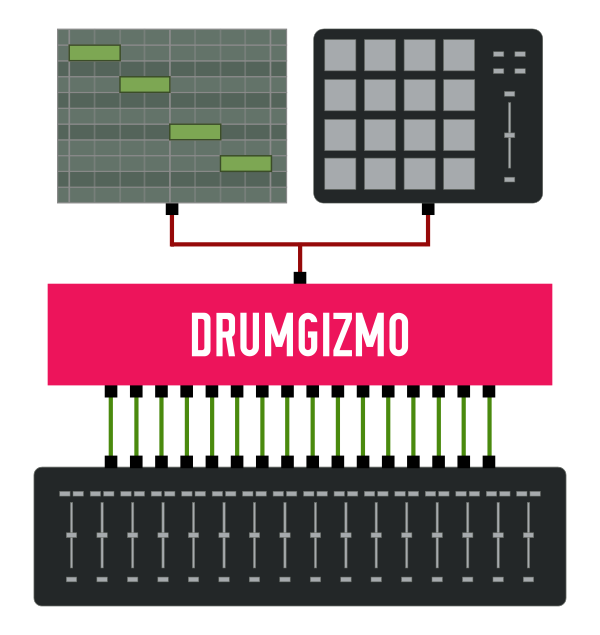
Drumgizmo's inputs and outputs
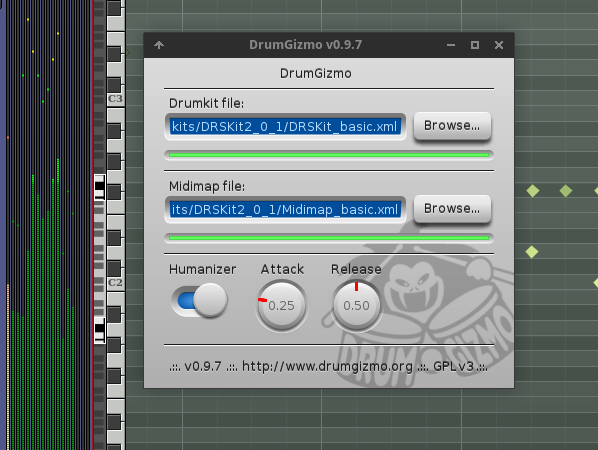
Drumgizmo itself has a very minimalist interface. This is because it deals only with the playback of samples. Its audio outputs are then routed and processed elsewhere, in our case inside of Ardour.
Drumgizmo has 1 MIDI input and 16 audio outputs. MIDI events from your DAW's MIDI editor or a MIDI instrument, such as an electronic drumkit, trigger samples in Drumgizmo. These are then routed out of its audio outputs and into channels in your DAW, where you can mix and process them individually.
Note - Different drum kits use different output configurations, so refer to any documentation about the kit you are using to make sure you know what each output is.
The set up
First, load up Ardour and create your new session. Next we want to create a MIDI track with Drumgizmo loaded up on to it. Then we will route its outputs so that we can mix and process each individual drum piece as we would if it were a real drum kit. Let's get started -
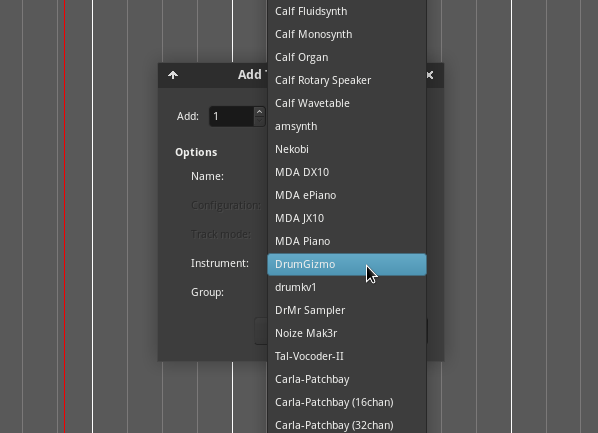
- Go to
Track > Add Track or Bus - Choose 1 MIDI track and select Drumgizmo from the drop down instrument list
- Name your track and click add. I'll simply call this track 'Drumgizmo'
Now that Drumgizmo is added to our session, let's load up a drum kit.
Double click on Drumgizmo to open up its interface. Before we get any sound of of Drumgizmo, we need to load up two files from the drum kit that we downloaded. These are -
- Drumkit file (this file tells Drumgizmo where to find a drum kits samples)
- Midimap file (this tells Drumgizmo what MIDI note values will trigger which samples)
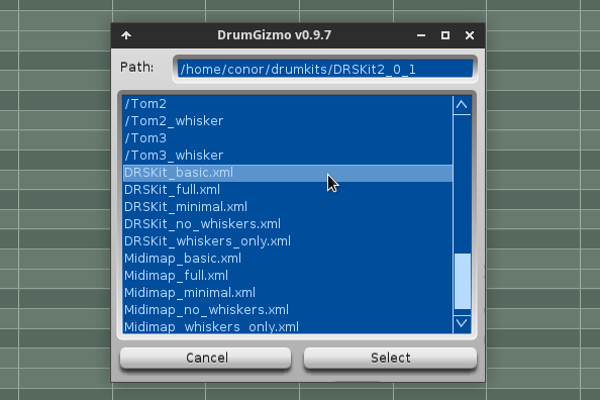
I have extracted the DRSkit into a folder within my home directory called 'drumkits', so I will navigate to this folder within Drumgizmo's browser. If you need to move back a folder when navigating, double clicking '..' will do this for you.
First browse for the drumkit file and select 'DRSKit_basic.xml'.
Then browse for the Midimap file and select the drum kits corresponding file 'Midimap_basic.xml'.
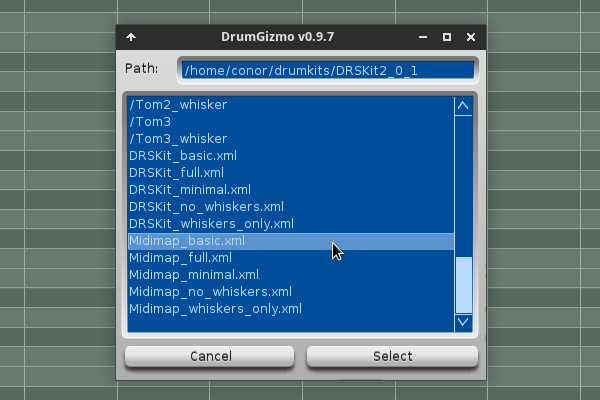
When you have both files loaded up, you will see a progress bar that will let you know when the kit is fully loaded. Wait for it to load up.
Editing a MIDI map file (optional)
The MIDI maps included with the drum kits found on the Drumgizmo website use notes values specified by the General MIDI standard. If you have a need to change these settings for any reason, eg. If your drum module has fixed MIDI output values not tied to General MIDI's drum mapping, you can easily edit any of the MIDI map files to suit your needs.
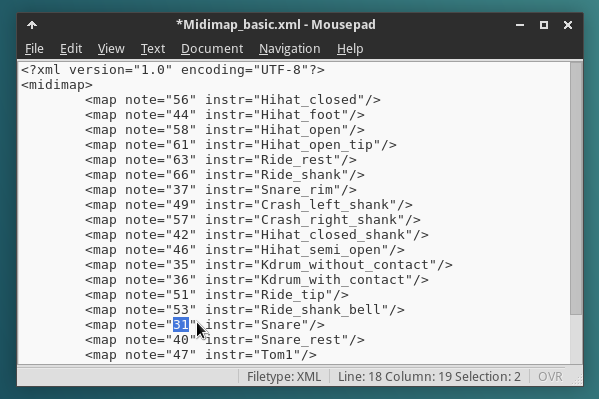
One of the drum modules I have has fixed output values. For example, the snare is fixed to send out on note 31, while the General MIDI standard uses 38. I can easily open up the MIDI map file in a text editor and amend this, or any other values, in the MIDI map file and save it.
Routing
Once you have Drumgizmo loaded up, you can increase your MIDI tracks height to reveal the piano roll. Using ctrl + f on a selected track will resize it to fit in the editor window. If you press the notes on the piano roll (C2 to C4 for most drum kits MIDI mapping) you will now hear some drum hits. This means that Drumgizmo is playing the samples loaded up, but to take full advantage of Drumgizmo, we need to make sure we have its outputs routed correctly.
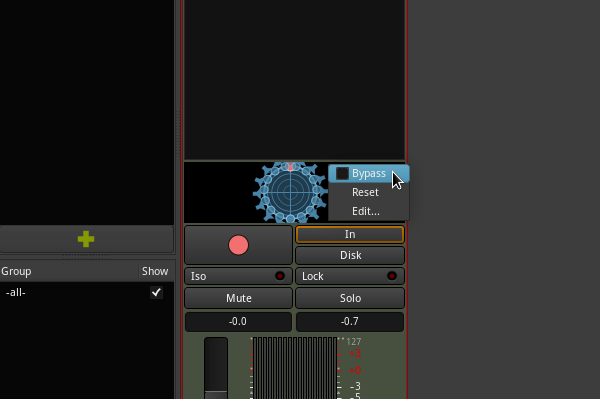
Before going any futher, make sure the pan control on the Drumgizmo track is bypassed. You can do this by right clicking on the panner and selecting bypass. If you don't do this, Drumgizmo will not route audio out of its outputs as expected. It is important you do this for things to work correctly.
There are two approaches to routing that I will show you. We can either route Drumgizmo's outputs to individual busses, or to individual audio tracks. Which way you choose to do this is down to personal workflow preferences. First we will look at routing Drumgizmo to bus tracks.
Routing to bus tracks
Routing Drumgizmo to busses is a common user case. How you route Drumgizmo's outputs depends on which drum kit you are using. You can find notes about which outputs are active, and what they are, on the drum kit section of the Drumgizmo website. For this tutorial we are using the DRSkit. On the websites documentation for this kit we can see that 13 of the outputs are active and that there are two stereo pairs for ambience and overhead.
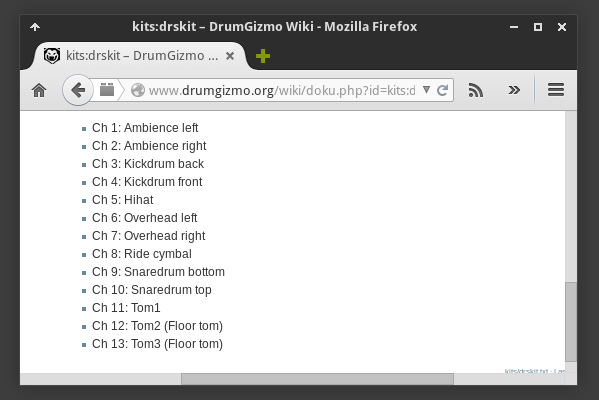
This means that we only need to create 11 bus tracks for Drumgizmo to be routed to.
This is what our outputs should look like -
| Track Number | Name | Configuration |
|---|---|---|
| Bus 1 | Ambience | Stereo |
| Bus 2 | Kick back | Mono |
| Bus 3 | Kick front | Mono |
| Bus 4 | Hihat | Mono |
| Bus 5 | Overheads | Stereo |
| Bus 6 | Ride cymbal | Mono |
| Bus 7 | Snare bottom | Mono |
| Bus 8 | Snare top | Mono |
| Bus 9 | Tom 1 | Mono |
| Bus 10 | Tom 2 | Mono |
| Bus 11 | Tom 3 | Mono |
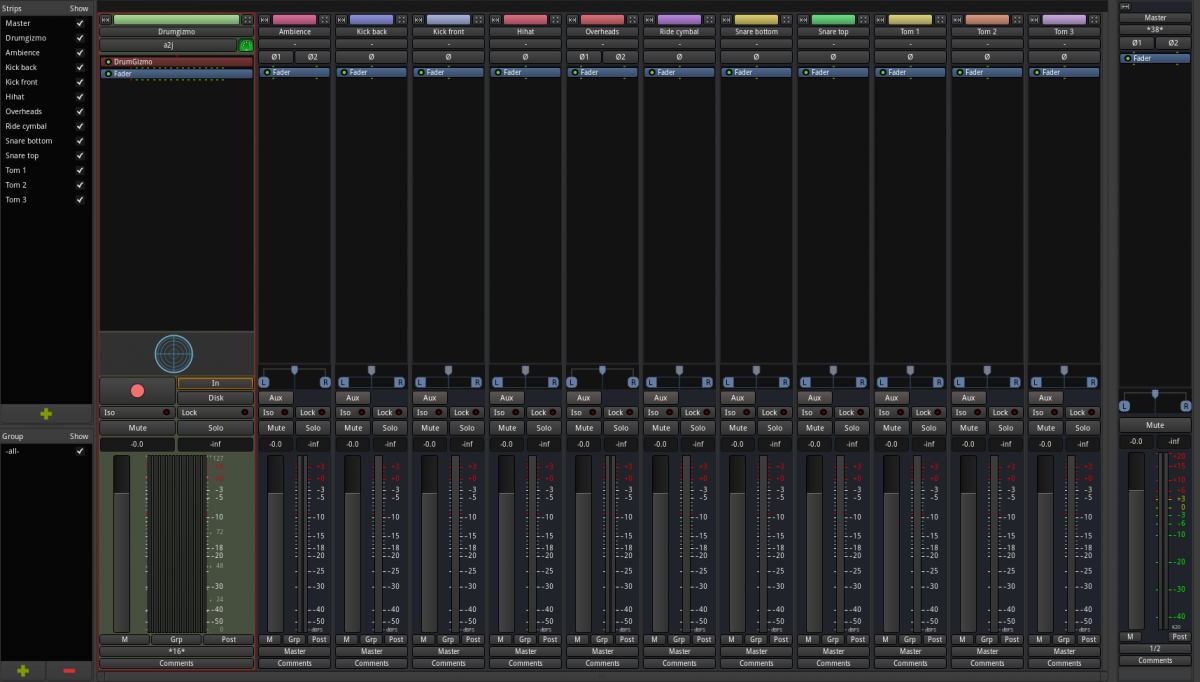
So let's create our bus tracks. We will first add 9 mono buses, then 2 stereo buses. We can easily rearrange the position of our stereo buses by dragging their position in the 'tracks and busses' tab of the editor list window (
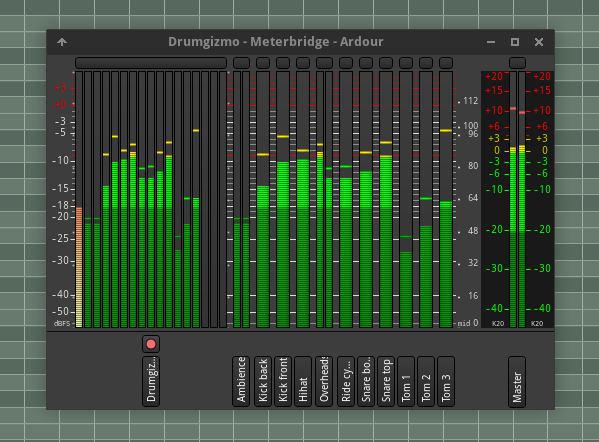
Your mixer window should now look like in the image below (click for full sized image).
We now have our bus tracks ready to be routed into. As already noted, when we play the piano roll, we can hear Drumgizmo. This is because by default, Ardour will connect Drumgizmo's outputs to the master bus but what we want is to route them through the bus tracks we have just created. So, let's first disconnect Drumgizmo from the master bus.
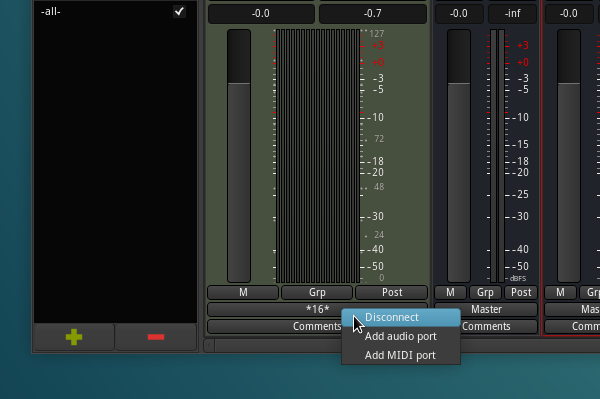
At the bottom of Drumgizmo's MIDI channel, you will see the number '16' indicating that there are 16 output connections being made from that channel. If you hover over this button you will see a tooltop showing you that all of those connections are being made to the master bus.
We could use the matrix connection window and manually disconnect each one, but a quicker way of disconnecting all connections is to left click (right click on versions of Ardour prior to Ardour 4) and select 'Disconnect' from the menu.
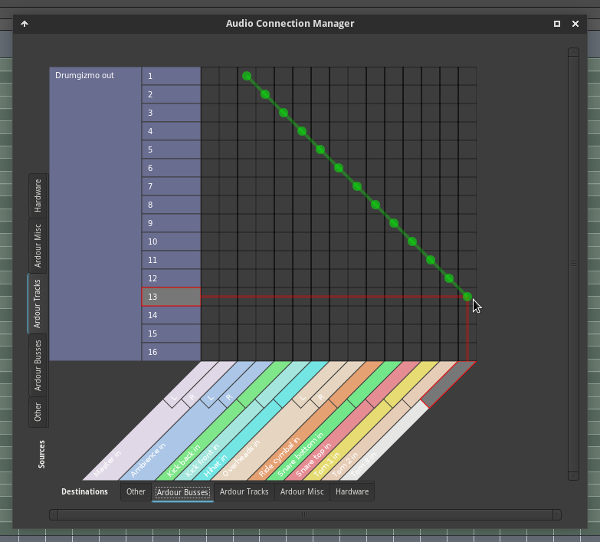
Next we want to connect our drum kits 13 active outputs to our bus tracks that we created. When making multiple connections in one go, it's easiest to do this from the audio connections manager window. This can be found in
From the tabs on the left hand side, click on 'Ardour Tracks' and you will see all of Drumgizmo's audio outputs. If you then click on the 'Ardour Busses' tab at the bottom, you will see all of our bus inputs. To connect Drumgizmo's output correctly, your window should now look like this -
Now when you trigger Drumgizmo from the piano roll, you will see the meters responding on the bus tracks. Success! We now have Drumgizmo fully set up.
Note – the reason why all meters respond upon triggering a single MIDI note is due to the simulated mic bleed. This is expected behaviour.
Using bus tracks to route Drumgizmo into allows you to program/record MIDI, edit it at any stage, and mix/process each individual audio outputs from Drumgizmo. This is a flexible way of working but as Drumgizmo's drum kits are quite large and consume a considerable amount of RAM, it might not be best suited for everyone's workflow. Let's look at an alternative way of routing Drumgizmo.
Routing to audio tracks
Another way to route Drumgizmo is by using audio tracks. This set up is identical to the previous example with one exception, you create audio tracks and route Drumgizmo into these instead of bus tracks.
One thing to note is that by default, any audio tracks that you add to Ardour will automatically connect themselves to your soundcard's inputs. Before routing Drumgizmo into your audio tracks, make sure to disconnect these connections in addition to disconnecting Drumgizmo from your master bus.
Why use audio tracks?
This method can be used if you intend to 'print' (record) the audio output of Drumgizmo to audio tracks. Some people prefer to 'print' audio to tracks when they have committed to a final sound/take. This can be helpful as it allows you to move forward with a mix and prevent the temptation to endlessly tweak your MIDI track. It can also free up system resources for mixing if you intend on deleting Drumgizmo from your session once you have the audio from your Drumgizmo tracks recorded.
Note - If you are using this method, make sure to have the input monitor buttons engaged on each track that you have Drumgizmo being routed to.
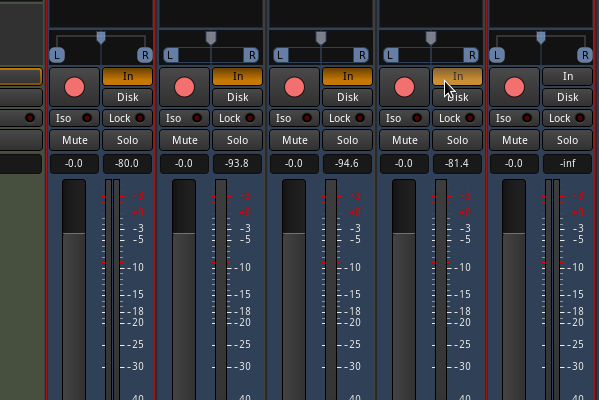
In this way you can monitor Drumgizmo the same as you did when you were using busses. When you have a final mix that you are happy to commit to, you can then arm these tracks and record Drumgizmo's outputs onto these audio tracks. At this point you can disable input monitoring to allow you to listen to the playback from your recorded tracks.
Inputting MIDI to Drumgizmo
Now you have Drumgizmo fully set up and ready for action. There are two ways you can work with Drumgizmo, either manually inputting notes into Ardour's MIDI editor window, or using a MIDI instrument to record in notes in realtime.
If you want to manually draw notes into the MIDI editor window, you can get to work right away. Check out 'Recording audio and using MIDI in Ardour 3' if you are not familiar with MIDI concepts in Ardour.
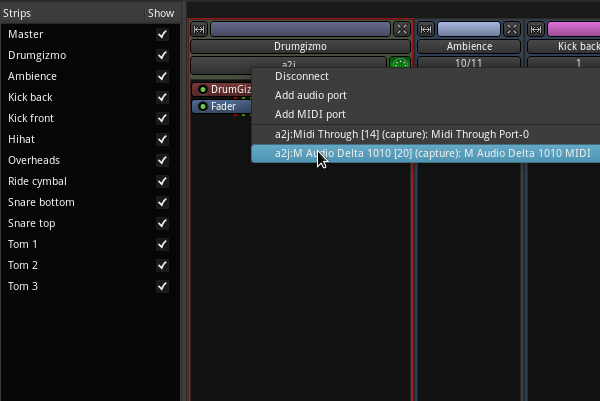
If you would like to use a MIDI instrument to play in notes, you will first need to make sure Drumgizmo's MIDI input is connected up to your MIDI instruments MIDI output port. My electronic drum kit is connected up to my soundcards MIDI input, so I can left click (right click on versions of Ardour prior to Ardour 4) on Drumgizmo's channel strip input and select that as my MIDI input.
A note about latency
If you are using a MIDI instrument to record using Drumgizmo, you will have to make sure that you have a suitable buffer size setting, or else there will be a noticeable delay in the samples being triggered. A setting between 64 and 256 for your buffer size should work best. It is recommended to use an audio orientated distro as this will allow you to get the best performance/stability when trying to achieve low latency monitoring.
Sample MIDI file
If you would like to experiment with Drumgizmo without having to worry about programming in or playing drums, I have prepared a MIDI file that you can import into your Drumgizmo track. It contains a basic drum beat but it should give you a feel for what Drumgizmo is capable of and how the DRSkit sounds. It can also be used as a starting point for experimenting.
You can download the MIDI file here.
Let's import the file to our MIDI track. First make sure that your Drumgizmo track is selected in Ardour's editor window. Then go to
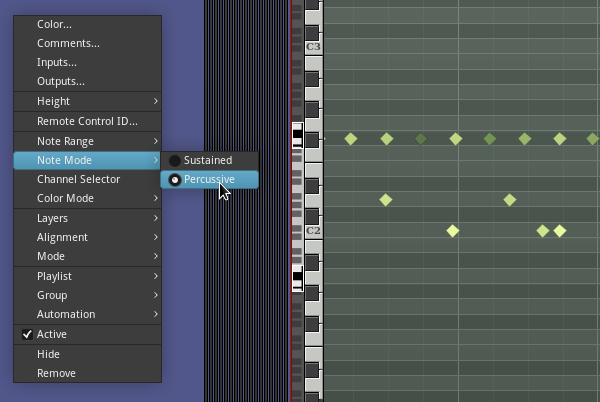
Tip - By default, Ardour MIDI tracks are displayed in 'sustained' note mode. When working with drums, it might be preferred to work using 'percussive' note mode. You can set your MIDI track to display notes this way by right clicking on your MIDI tracks header and navigating to
Templates
It doesn't take too long to correctly set up Drumgizmo in an Ardour session, however, if you are using the same set up each time it makes sense to create a template.
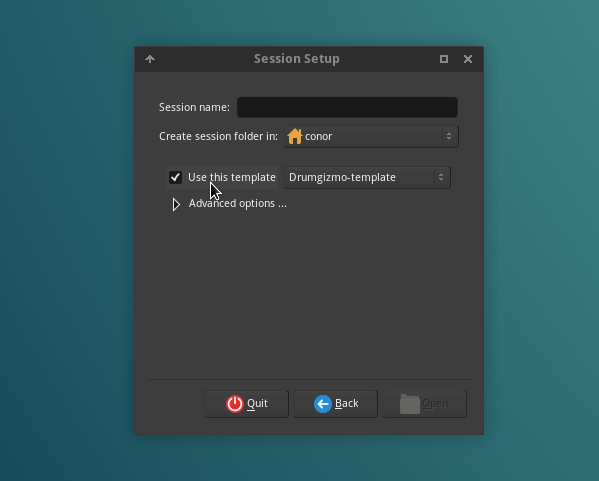
Once you have everything set up as you want it to be, go to
Whenever you start Ardour in future and click on 'New session', you will see the option to 'Use this template'. Give your new session a name, make sure the 'Use this template' box is ticked, select 'Drumgizmo-template' from the drop down menu, and you're ready to go.
Create your own kits
If you want to create your own drum kits, the Drumgizmo developers have also created Dgedit. This allows you to easily load up your recorded drum hits, intelligently split them up and organise them by velocity.
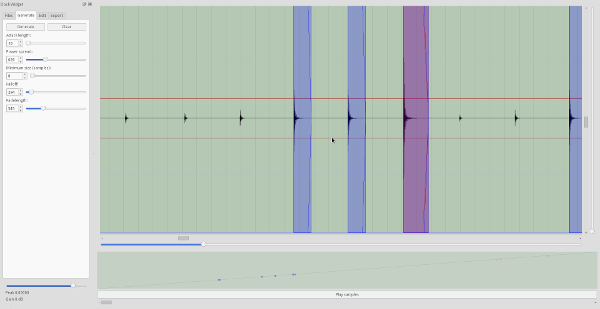
The developers have done great work on this editor to make the work involved in sampling a real drum kit a lot less tedious. Dgedit was previously bundled with Drumgizmo but has since been moved into its own separate project. Using Dgedit is beyond the scope of this tutorial but for anyone interested you can check out the dgedit git repository.
If you do create a drum kit for Drumgizmo, why not make it available to the community!
Summary
Drumgizmo is a great piece of software and is very capable of creating realistic drum recordings. There are various proprietary drum plugins out there on other platforms that have high quality sample kits. Where Drumgizmo really has the edge over these is that you can create your own drum kits. This is not something other comparable drum plugins allow you to do, as you are tied into only using their proprietary sample kits. This makes Drumgizmo open in more ways than one, allowing anyone to create and share drum kits. As well as the impressive results it yields, it is also this openness and expansiveness that really makes it an interesting piece of software.
Written by Conor Mc Cormack